I work up various desktop backgrounds to match the season (or my mood)- see “Desktop Wallpapers” for more. With Thanksgiving coming right up, I thought I’d create one for the verse about Thanksgiving from Colossians 2:7.
I set the Thanksgiving table today. It’s a wise thing for two reasons: #1- It can be done ahead, before the kitchen work gets intense, and #2- The weight of the plates and such help pull any wrinkles out of the tablecloth. That’s right- a no iron tablecloth is my goal!
I made the centerpiece ahead of time too- just rounded up some of garden produce kicking around the yard, plus a few greens. Put all that in a burlap-lined wooden box filled with some mason jars. I added little candles to the jars- pretty! (See bottom of post for a closeup of that).
The table looked so pretty, I wanted to create some computer monitor wallpaper out of a picture of it. I found this great Thanksgiving Bible verse to go with it, from Colossians 2:7- “Be strengthened by the faith that you were taught, and overflow with thanksgiving.”
To use the picture for a desktop background, click the links below, sized to fit wide or short monitors. Left click on the monitor size you want, which brings you to the actual picture, then right click and choose “select (or set) as desktop background”.
This is one of the first recipes my son wanted after moving into his own place. I don’t think it’s that it’s the most amazing recipe ever, but that we had a lot of good memories of meals shared, enjoying this dish. Chowing down on a hearty helping of this after soccer practices… that kind of stuff!
This dish can be thrown together easy, with some pasta on hand, and a bit of sour cream, chicken, and spice. The sour cream adds richness, but yogurt can be substituted. For a more authentic Hungarian flavor, toasted caraway seeds can be added. Serves 4.
INGREDIENTS:
3 to 4 c. cooked, boned chicken
1 green pepper
1 red pepper
12 oz. or so dry fettuccini (or choice of pasta)
1/4 c. olive oil
1/4 c. flour
1 TBS. paprika
1 tsp. salt
1/2 tsp. pepper
1/2 TBS. chopped, fresh garlic
1 1/2 c. chicken stock
1/2 c. sour cream
(optional) 1 tsp. toasted caraway seed
Chicken for this dish is best “pulled”, or torn, into pieces, as more sauce clings to it this way. Prepare the chicken ahead of time, or grill 3 or 4 half breasts, to yield: > 3 to 4 c. cooked, boned chicken, pulled (torn) into 1 to 2″ chunks
Also prepare peppers, chopping into 1/2″ diced pieces: > 1 green pepper > 1 red pepper
Grill the diced peppers in very hot skillet for a few minutes, in a little olive oil, with a splash of water to steam them a bit. Set cooked peppers aside.
Cook the following until tender, rinsing, cooling, and tossing with a bit of olive oil to keep it from clumping: > 12 oz. or so dry fettuccini (or your choice of pasta)
In iron skillet or saucepan, mix: > 1/4 c. olive oil > 1/4 c. flour > 1 TBS. paprika > 1 tsp. salt > 1/2 tsp. pepper > 1/2 TBS. chopped, fresh garlic
Slowly add: > 1 1/2 c. chicken stock
Bring mixture to a boil. Boil and stir for 2 minutes. Turn off heat, adding last: > 1/2 c. sour cream > The cooked chicken chunks > Diced, cooked peppers > (optional: 1 tsp. toasted caraway seed, crushed)
Serve over the cooked pasta, with a side dish of steamed green vegetables, as desired, for extra color.
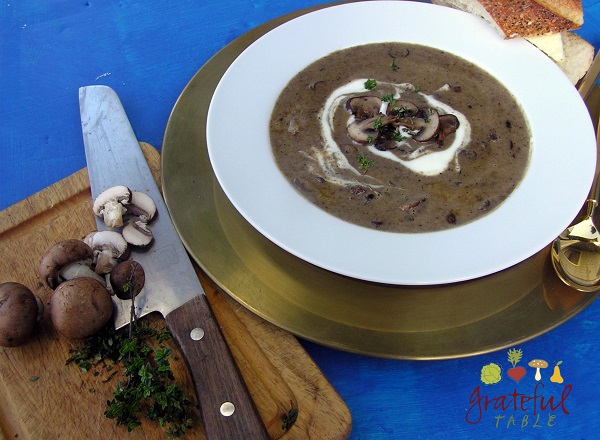
We used to make a more traditional mushroom soup at The New Deli, using a roux of flour and butter. But why use flour if you can go gluten-free, and let something else give the soup body?
Now we caramelize a pile of onions in butter until golden, then puree that with some mushroom powder. This porcini powder from Amazon is super flavorful. It’ll last a while, which is good, since it is a bit pricy!
We also tried to make our own mushroom powder, which is what the French use in some of their fancy recipes. It can be made with dehydrated mushrooms (see nomnompaleo’s recipe here), but it was way too much work when we tried to dry our own mushrooms… (I’m sticking with already-made porcini powder!)
INGREDIENTS
3 lb. onion
2 TBS. minced fresh garlic
1/2 c. butter (1 stick)
2 TBS. (1 oz.) mushroom powder
2 TBS. Worchestershire
2 tsp. salt
1 c. cream
1-2 lb. mushrooms
Optional: fresh thyme
Enough liquid to get to right consistancy
PREPARATION
Saute the onion and garlic in butter until golden and somewhat caramelized: > 3 lb. onion > 2 TBS. minced fresh garlic > 1/2 c. butter (1 stick)
Add: > 2 TBS. mushroom powder
Stir mushroom powder in; bring back to a boil, then puree until smooth (in blender, food processor, or with immersion blender).
In hot skillet, brown the fresh, sliced mushrooms in a bit of olive oil, not adding too many at a time, or they’ll just steam. Use: 1-2 lb. mushrooms
Add to the pureed onion mix in pot, stirring until smooth: > 2 TBS. Worchestershire sauce > 2 tsp. salt > 1 c. cream > Optional: fresh thyme > the grilled mushrooms > Enough liquid to get to right consistancy
Serve with a swirl of sour cream or yogurt if desired.
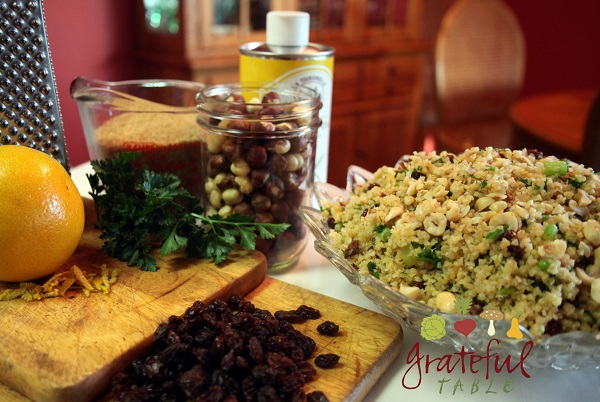
This rice salad reminds me of fall– the flavors seem warm and comforting!
In the old days (yes, I’ve been cooking a long time), we had to get raw hazelnuts in bulk, with the skins on. That meant roasting them and then rolling them in a towel to get the bitter skins off. A tedious job. Or, my mom had another method, adding baking soda to some boiling water and soaking them in that. How much easier now, that I can just pick some up, already toasted and ready to use, at Trader Joe’s!
This is a hearty side dish that goes well with roasted chicken around the holidays. Prepare much of it ahead of time, mixing it all together just before serving. Serves 9.
INGREDIENTS
2 c. boiling water
2 c. cracked wheat or bulgar (found at health food stores)
1 c. hazelnuts
1/2 c. raisins
1/2 c. fresh parsley
1/2 c. almond oil (or Virgin olive oil)
2 TBS. frozen orange juice concentrate (or substitute freshly-juiced, and reduced)
Zest from 1 orange (or 2 drops orange extract)
Juice of 1 lemon
1/2 bunch green onions, chopped
1/2 TBS. salt
Prepare the cracked wheat the morning or the night before serving, letting cool in the refrigerator with the lid on, without stirring. Add the following to a large bowl: > 2 c. boiling water > 2 c. cracked wheat or bulgar (found at health food stores)
Cover and let sit 10 minutes before refrigerating. Next, toast the following nuts at 400° for 10 minutes or so, until golden. Rub off skins inside a clean towel afterward (they don’t all slip off; some skin will probably remain): > 1 c. hazelnuts
Chop nuts coarsely, by hand or in food processor, after they cool. (Already toasted, chopped hazelnuts are convenient. If available, skip the above steps.)
Set aside nuts, then process coarsely in food processor (or chop by hand): > 1/2 c. raisins > 1/2 c. fresh parsley
All the above, and the dressing below, can be prepared ahead of time. To serve, mix all the above with a mixture of the following: > 1/2 c. almond oil (or Virgin olive oil) > 2 TBS. frozen orange juice concentrate (or substitute fresh squeezed orange juice, boiled some to reduce) > Zest from 1 orange (or 2 drops orange extract) > Juice of 1 lemon > 1/2 bunch green onions, chopped > 1/2 TBS. salt
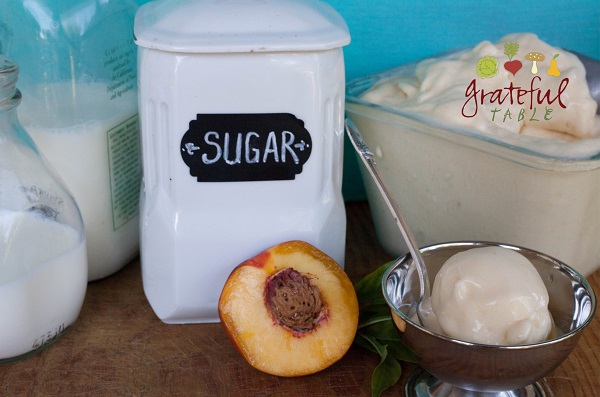
It isn’t surprising that this ice cream tastes awesome. After all, how can you go wrong with sugar, cream, milk, and fresh peaches?! Take it to the next level with organic peaches… so good.
I tried a few different sources for good organic peaches, since I just can’t seem to grow ’em in the Bay Area (not in my yard, anyway…). Nope, the ones in the farm box I received at my doorstep were not ideal. And Trader Joe’s weren’t so hot either. Of all places, Safeway had ’em. They must’ve been picked at just the right time- they were so fragrant and delicious.
I had some extra, and we added them to this recipe. I figured it was just a bit healthier since we were adding organic peaches to the mix. And we used organic cream and milk. A treat!
INGREDIENTS
2 c. milk
3/4 c. sugar
1 egg
2 1/3 c. approx. mashed, peeled peaches (about 4 or 5)
2 c. cream
1/8 tsp. salt
Microwave 4 minutes, or heat in pan: > 2 c. milk > 3/4 c. sugar
In separate bowl, stir well: > 1 egg
Stir hot milk mix into eggs, stirring well. Microwave 30 seconds, stir, repeat (or reheat in pan just until cooked, but not boiling).
Add to the above: > 2 1/3 c. approx. mashed, peeled peaches (about 4 or 5) > 2 c. cream > 1/8 tsp. salt
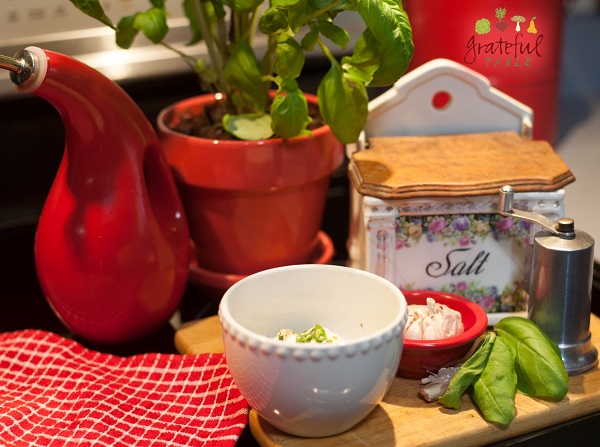
Some folks think there’s something magical about our Italian dressing at the deli. Well, it’s true that food can often taste better when someone else makes it. But still, why is that homemade New Deli Italian dressing so dang good?!
I think part of it is that the garlic and herbs are mixed together with the salt first. The garlic absorbs some of the salt, and the saltiness dissipates into the dressing. The salt seems to be a vehicle to carry the flavors along.
Sounds kind of mystical! But, try it. If not in the Italian dressing recipe, try on a small scale with fresh mozzarella. So delicious!
Costco carries an imported fresh buffalo milk mozzarella that’s deluxe. Or, regular fresh mozzarella will do! Serves 6-8 or so, as a side salad.
INGREDIENTS
2 cloves garlic, minced
1/2 tsp. salt
fresh cracked pepper
several fresh basil leaves (or sub other green herbs)
1/3 c. extra virgin olive oil
1 lb. fresh mozzarella
6 oz. spring greens
3 tomatoes, wedged
Marinate the garlic in salt, letting it steep for at least five minutes. Use: > 2 cloves garlic, minced > 1/2 tsp. salt
After steeping, add: > 1/3 c. olive oil > parsley > fresh cracked pepper > 1 lb. fresh mozzarella
To serve, put a handful of spring greens on salad plates, top with the marinated mozzarella and tomato wedges.
Rice-cooker, step aside. There is more than one way to skin a cat (ew- sorry, PITA). What I mean is, there’s more than one way to cook rice!
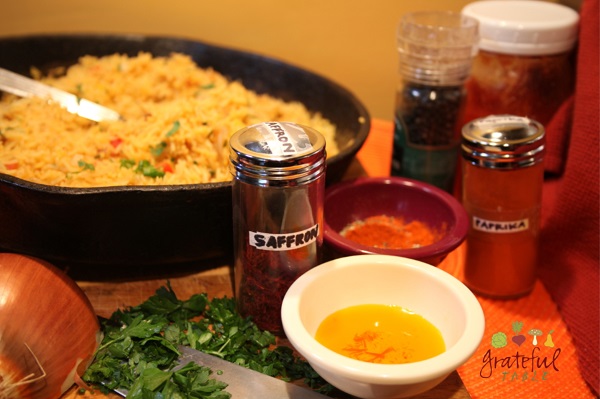
Paella is a Spanish rice dish, typically made in a “paella pan”. (My iron skillet works just fine.) I add a bit of turmeric to this too- it’s got many benefits, including being anti inflammatory. Plus, when turmeric is coupled with black pepper, its healthy effects are squared to the tenth power! (Or something like that…)
Coax flavor out of a pinch of saffron threads by steeping it first (like a tea infusion). Also, use leftovers, if desired, in place of seafood in this dish. Makes around 6 servings.
INGREDIENTS
Pinch of saffron (about 18 threads)
1 lb. uncooked sausage
1/2 c. onion
1/4 c. olive oil
1/2 TBS. paprika
1 tsp. oregano
1/2 tsp. turmeric
1/2 tsp. black pepper
2 cloves garlic
1/2 tsp. fresh rosemary (or to taste)
1 c. tomato pieces (or sub red pepper)
1 1/2 c. rice (short grain or Aborio)
3 c. boiling water
1 1/2 tsp. salt
1/2 c. green peas (or 1 TBS. parsley, for color)
1 lb. scallops, shrimp, or other favorite
PREPARATION
Steep saffron in boiling water in small bowl; set aside. Use: > pinch saffron (about 18 threads) > 1/4 c. boiling water
Cut raw sausage into pieces and grill in iron skillet, setting aside when browned. Use: > 1 lb. uncooked sausage (of choice)
Cook the onion and olive oil in an iron skillet over medium heat until tender. Use: > 1/2 c. onion > 1/4 c. olive oil
Add to onions, heating until fragrant, stirring well: > 1/2 TBS. paprika > 1 tsp. oregano > 1/2 tsp. turmeric > 1/2 tsp. black pepper > 2 cloves garlic > 1/2 tsp. fresh rosemary (or to taste)
Add the tomatoes to the onion/seasoning mix and heat, stirring occasionally, until liquids are reduced and tomatoes caramelize some. Use: > 1 15-oz. can tomato pieces (or sub red peppers, diced)
Add the rice and stir well. Use: > 1 1/2 c. white rice (short grain or Aborio)
Add hot water, cover pan with foil, and simmer for 20 minutes. No need to stir, but shake the pan a bit, so the rice cooks evenly and absorbs the liquid. Use: > 3 c. boiling water
Add to the pan last, burying the raw seafood under the rice, so it’ll cook. Also add the saffron water. Simmer without stirring for another 8 minutes or so, until rice is al dente. Use: > 1 lb. scallops or shrimp > the saffron water
After 8 minutes or so, stir in the salt, and add green peas for color (or some fresh-chopped parsley). Also add the reserved, cooked sausage. Use: > 1 1/2 tsp. salt > 1/2 c. green peas (or 1 TBS. parsley, for color) > reserved, cooked sausage
Let rice finish cooking, until fluffy and moist. When done, turn heat up for half a minute or so, to lightly toast the bottom layer of rice. Serve with a side of lemon wedges.
A favorite family memory has been enjoying a giant apple pancake at The Original Pancake House in Birmingham, Michigan (after standing in the very long line).
My sister was trying to duplicate this years ago, before the internet. More recently, I’ve scoured the web and tried countless variations, finally concluding that this particular recipe comes pretty close to the pancake house recipe. Whew! I wasn’t sure how many more of these we could eat! (We really suffer for our art, ha…)
A popover-type batter rises up as it bakes in the caramelizing apples. And it can be convenient to serve for company, since the batter can be prepared ahead of time.
Serves 3-4.
INGREDIENTS
3/4 c. flour
1/2 tsp. nutmeg (fresh-grated is nice)
1/2 tsp. salt
3/4 c. milk, room temperature
4 eggs
1/3 c. butter
1/3 c. brown sugar
1/3 c. sugar
2 tsp. cinnamon
PREPARATION
1. Make batter the night before, if possible. (Or let it rest at least 10 minutes.) For the batter, whisk milk into the flour and salt in a bowl (small lumps are OK). Use: > 3/4 c. flour > 1/2 tsp. nutmeg > 1/2 tsp. salt > 3/4 c. milk
2. Add eggs one at a time: > 4 eggs
3. Refrigerate the batter overnight, or let rest (up to several hours) at room temperature.
4. The cinnamon and sugar can also be mixed together ahead of time. Use: > 2 tsp. cinnamon > 2/3 c. sugar
5. To prepare the pancake, bring batter out of refrigerator. Preheat oven to 400 degrees.
6. Peel, core, and slice the apples. Use: > 3 c. sliced, tart apples
7. Turn iron skillet* on medium high heat and add to the pan: > 1/3 c. butter > 3 c. sliced, tart apples > the cinnamon/sugar mix
8. Stir the butter, apples, and cinnamon sugar for 2-3 minutes, until apples have softened some and the mixture is bubbling.
9. Pour the pancake batter on top of the apple mixture.
10. Bake for 20 minutes or so, until lightly browned.
11. To serve, turn upside-down onto plate; sprinkle with the remaining cinnamon sugar.
*If skillet isn’t available, use a Pyrex pan and heat the butter/apple/sugar mix in the oven for 10 minutes.
This was a really fun cake to make for our grandson Benjamin’s fourth birthday. A picture’s worth a thousand words, right? So… you can use the picture below for ideas.
We got the whole family involved. We scavenger-hunted at various stores for the supplies (mainly the frozen yogurt shop, and Trader Joe’s). Here are the goodies we used to pull this together:
We got this catapult on Amazon, which worked great with chocolate malt “cannon” balls
We got both kinds of cones from the yogurt shop- cake cones for the base, and pointy cones for the top
We were also able to get rock candy at the yogurt shop
We got Panda licorice at Trader Joe’s, to use for windows
We had some Trader Joe’s rosemary crackers on hand- a piece of that was perfect for the castle door
And graham cracker crumbs worked for the “dirt” pathway
I’ve since lost the sheet we did the math on, to have a larger square of cake for the foundation, plus the smaller squares of cake on top of that. But you can figure it out!
The non-baker (my husband) worked out the math with our older grandson, while the bakers (my granddaughter and myself) baked the cake. And everyone was able to help decorate! A memorable birthday. And birthday cake, haha…
PS We used a simple chocolate glaze for frosting. Warm the mix again after adding the chocolate chips to the melted butter, if necessary. Also, cool the frosting, if necessary, to get it to the right spreading consistency. Use: > 1/2 c. butter, melted > 1 c. chocolate chips (stirred in until melted)
If you scour the web for nutritional info on super foods and health and such, you may already know how cod liver oil is even more effective when mixed with grass-fed butter. You may have noticed that the quality supplier, Blue Ice, carries a product called “Royal Butter/Cod Liver Oil Blend“. (If you love scientific details, check out Sally Fallon’s article here.)
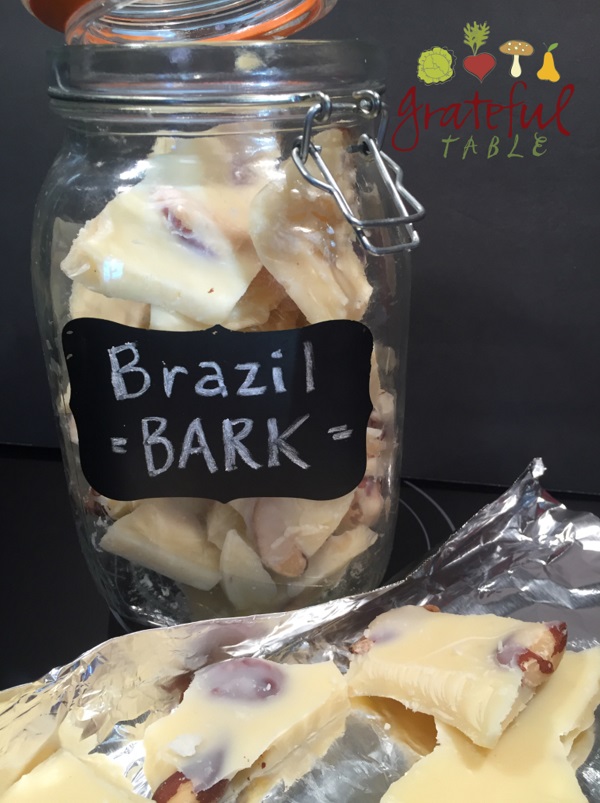
And you know me- always looking for ways to save time and money. Hence, “Brazil Bark”. I take my morning shot of cod liver oil, but also have a smoothie made with a hunk of this bark stuff. It looks like a confection, and it actually is pretty tasty. But also- so convenient!
This recipe makes making smoothies EASY. You can add your coconut and nut milk and that side o’ butter (if you’re taking cod liver oil), all in one easy step. The coconut (oil or spread) is for those great MCTs that contribute to brain health and energy. The butter is because it works so well with the cod liver oil we should be taking, to maximize results. And the Brazil nuts are good to include because they give us our daily selenium, which can be hard to come by.
Yes, you could just buy cartons of almond milk for your smoothies. But- larger carbon footprint! You pay for a lot of water and a little nut meat, plus the extra container. Why not just puree a few nuts fresh, right?
But is that box of almond milk so great? There’s also the fact that nuts contain a lot of PUFAs (polyunsaturated fats), which messes with our Omega 3 to Omega 6 ratio. Yes, I know, “but they’re healthy for you, aren’t they?”
Well… we usually get assaulted with too many PUFAs in our modern diet. So this Brazil Bark stuff is actually more balancing to the system that almond milk and the like.
Just one more note: For smoothest results, puree a week’s worth of Brazil Bark with some boiling water in the blender. Process it, then store in a jar in the fridge; it will keep for a week or so. Add a hearty spoonful of it to all the other great smoothie ingredients, for some good, quick nutrition.
Brazil Bark
Ingredients
1 lb. (or one 15-oz. jar) coconut butter (or “coconut manna“, coconut cream concentrate, or coconut spread, which are all 100% coconut meat, ground to a puree)
1 lb. butter (grass-fed, like Kerry Gold. “Organic” is not necessarily grass-fed)
1 lb. Brazil nuts
To get hardened coconut cream out of the jar, set the jar on a folded cloth in a small pot of hot water. Let it warm gently on low heat.
Mix the softened coconut butter with the butter in a small pot, until melted. Use: > 1 lb. butter, melted
Last, stir in: > 1 lb. Brazil nuts
Cover a cookie sheet with a piece of heavy-duty foil, making edges by crimping up sides. Pour mixture on foil; refrigerate overnight.
Next day, break bark into pieces and store in glass jar. (Or leave on the foil, to break up as needed.) Will keep a few months in refrigerator.
If desired, blend some with boiling water in the blender until smooth. Keep refrigerated, using in smoothies or hot drinks as needed. It makes “smoother smoothies” this way!
 The table looked so pretty, I wanted to create some computer monitor wallpaper out of a picture of it. I found this great Thanksgiving Bible verse to go with it, from Colossians 2:7- “Be strengthened by the faith that you were taught, and overflow with thanksgiving.”
 To use the picture for a desktop background, click the links below, sized to fit wide or short monitors. Left click on the monitor size you want, which brings you to the actual picture, then right click and choose “select (or set) as desktop background”.
 This dish can be thrown together easy, with some pasta on hand, and a bit of sour cream, chicken, and spice. The sour cream adds richness, but yogurt can be substituted. For a more authentic Hungarian flavor, toasted caraway seeds can be added. Serves 4.