This is an elegant cake for special occasions. The génoise-style sponge cake is pretty dry, which means that after baking, it will soak up the simple raspberry juice concentrate that’s brushed between the layers, without getting soggy.
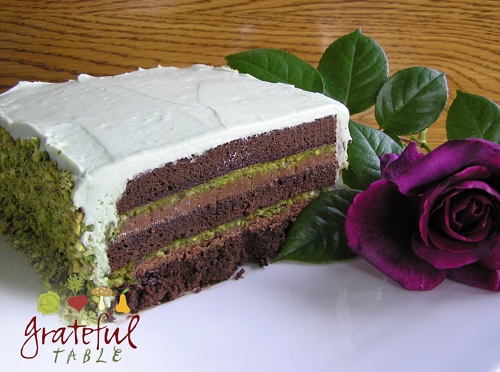
With this recipe, most of the pistachios are finely processed; a bit of sugar and butter are added to make it like an almond paste (or “marzipan”), which can be rolled out and laid between layers. The rest of the pistachios are more coarsely ground, to add to the sides of the cake.
This chocolate cake has a simple chocolate mousse filling that uses whipped cream; the rest of the whipped cream is used in the frosting (saving steps).
You can make a half recipe of this cake, but I just figure…so much work–it better be a special occasion! Serves 15-20.
INGREDIENTS
- 8 eggs
- 1 1/3 c. sugar
- 3/4 stick butter (6 TBS.), plus scant 1/2 c. (3 1/2 oz.) butter, melted
- 2 tsp. plus 1 TBS. vanilla
- 3/4 c. plus 2 TBS. flour
- 3/4 c. plus 2 TBS. unsweetened cocoa powder
- 1/3 c. seedless raspberry jam (or substitute an extra 1/3 c. juice concentrate)
- 1/3 c. Frozen Raspberry/White Grape Juice Concentrate
- 1/2 lb. raw, shelled pistachios (1 2/3 c.)
- 1/4 lb. or more (1 c. or so) pistachios (for decorating, if desired)
- 1/2 c. plus 1 c. confectioner’s sugar
- 1 tsp. almond extract
- 1/2 c. plus 1/3 c. semi-sweet chocolate chips
- 2 1/2 TBS. water
- 1 qt. whipping cream (4 c.)
Chocolate “Genoise” Cake
PREPARATION
1. To make the egg/sugar mix, use room-temperature eggs, warmed in hot water first: > 8 eggs
2. Add warmed eggs to a bowl, along with the sugar, setting bowl in warm water until lukewarm. A double boiler on the stove might provide enough heat to warm up the ingredients. Stir occasionally. Use: > the 8 room-temperature eggs > 1 1/3 c. sugar
3. In separate cup, microwave mixture of: > 3/4 stick butter (6 TBS.) > 2 tsp. vanilla
4. Mix dry ingredients together separately. The following measurement actually equals 1 c. minus 2 TBS., which can be an easier way to measure! Use: > 3/4 c. plus 2 TBS. flour > 3/4 c. plus 2 TBS. unsweetened cocoa powder
5. Preheat oven to 350 degrees. Grease cake pans (two 9″x9″ or round cake pans); dust with flour. (Or size of choice; baking times will vary accordingly.)
6. Beat egg/sugar mix until tripled in volume. Fold in spoonfuls of flour mixture at a time, into egg mixture, repeating until mixed in. Fold in melted butter/vanilla last. Put into prepared pan and bake until cake begins to pull away from sides of pan and is springy, about 30 min. Let cool.
Raspberry Filling, Mousse, & Frosting
ASSEMBLY
1. Prepare Raspberry Filling: microwave jam in a small bowl, using: > 1/3 c. seedless raspberry jam (or omit and double up on juice concentrate)
2. Add to the bowl: > 1/3 c. Frozen Raspberry/White Grape Juice Concentrate (or use 2/3 c. and omit jam)
3. Optional: If you choose to decorate the sides of the cake with pistachios, process some extra nuts, chopping until medium-fine: > 1 c. pistachios (for decorating, if desired)
4. Set chopped nuts (for decorating) aside. Prepare “Pistachio Paste”: first process nuts (before adding the confectioner’s sugar and butter). Process until smooth, using: > 1/2 lb. raw, shelled pistachios (1 2/3 c.)
5. To processor, add: > 1/2 c. confectioner’s sugar > scant 1/2 c. (3 1/2 oz.) butter, melted > 1 tsp. almond extract
6. Process until well-blended. Set Pistachio Paste aside. Note: Many recipes use a small amount of water or egg white instead of the butter; use according to preference (I prefer the butter).
7. Prepare chocolate mousse filling, and frosting for cake. For that, microwave 30 seconds or so, and stir until melted: > 1/2 c. plus 1/3 c. semi-sweet chocolate chips > 2 1/2 TBS. water
8. Set the melted chocolate mixture aside and let cool off some. Meanwhile, whip just until soft peaks form: > 4 c. chilled whipping cream
9. To prepare the Chocolate Mousse, fold into the cooled chocolate mixture: > Approx. 2 c. of the above whipped cream
10. Set aside. Meanwhile, to the rest of the whipped cream, add: > 1 c. Confectioner’s sugar > 1 TBS. vanilla
11. Set the frosting aside.
12. Split the sponge cake into three layers using serrated knife, setting the first layer (cut-side up) on a cardboard cake rectangle (or flat cookie sheet). Set the other two layers on wax paper, cut side up. Drizzle the raspberry mixture over the cut side of all three layers.
13. For the first layer, after adding the raspberry mixture, add about half of the chocolate mousse mixture. Next, add half the Pistachio Butter, rolled out into the shape of the baked cake. Roll it between two layers of plastic wrap, then lift onto the cake, pulling the top half of the plastic wrap off afterward.
14. For the next layer, carefully set the middle layer of cake drizzled with raspberry syrup, on top of first layer of cake, raspberry, and pistachio. Add the other half of the chocolate mousse mixture. Also, add the second half of the pistachio paste, again rolled to fit the layer.
15. Finally, lift the top layer of cake (raspberry side down) onto the other two layers.
16. Color the frosting if desired. For a “Pistachio Green” color, use a touch of red and yellow along with the green food coloring. Frost the cake with the Whipped Cream/Confectioner’s sugar mixture.
17. If desired, sprinkle chopped pistachios on the sides of the cake. Another decorating idea: Fondant ribbons. See notes to the left on working with fondant. To get a nice purplish-wine color, I mixed the intense purple fondant that came in the box, with a few of the other colors, to tone it down.
18. You can make this cake a day ahead, or in steps. I often bake the cake earlier in the week, freezing it until assembly time.