A bit of Papaya Salsa can dress up a fish fillet, or get tossed into rice; add a side green salad topped with chopped Macadamias, in keeping with the tropical theme. Delicious!
Mexican papayas are becoming easier to find. They aren’t quite as sweet as Hawaiian papayas, but they’re also less likely to be genetically modified. They might be a little uglier on the outside too- often a mottled brown/green/orange color. But this colorful fruit is especially healthy, fighting inflammation, promoting heart health, and aiding digestion. Limes go especially well with papayas, but lemons can substitute. This salsa is the perfect summer topping for grilled fish, or even over some greens as a salad. Serves 6-8.
INGREDIENTS
Half of one large Mexican papaya (about 3-4 c.)
Half of a Red onion
2 cloves garlic
1 jalapeno pepper (or to taste)
Half a bunch of cilantro (about 1/2 c.)
Optional: Spearmint or parsley
1/4 c. olive oil
1 tsp. salt
Juice from 1-2 limes
PREPARATION
1. Mix in medium bowl: > Half of a red onion, chopped fine > 2 cloves garlic, minced > 1 Jalapeno pepper (or to taste), chopped > Half a bunch cilantro (about 1/2 c.), chopped > 1/4 c. olive oil > 1 tsp. salt
2. After mixture’s coated with oil, add and mix again: > Juice of 1-2 limes > Half a papaya (about 3-4 c.), chopped
3. Serve this salsa as a topping over fish or other favorites. Add fresh spearmint for variety, if desired. Substitute pineapple for the papaya, if papaya isn’t available.
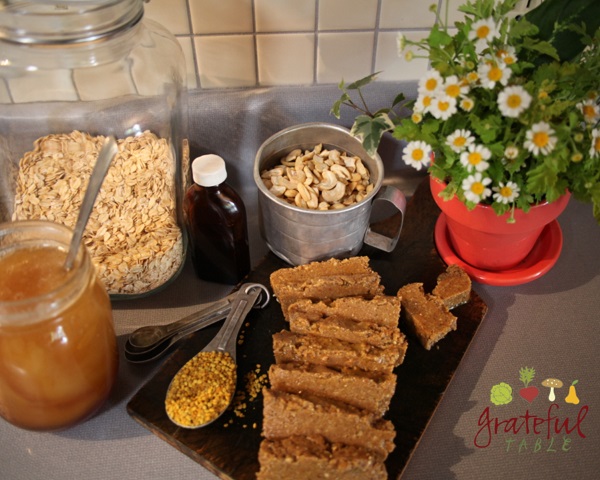
These energy bars are made with ground, raw oatmeal, which is roasted in a skillet until golden. For another version that uses granola, see this recipe.
Raw honey (local if possible), plus the bee pollen, can help allergy sufferers approach symptoms nutritionally- the extra nutrients and enzymes in pollen can really help! Cinnamon helps insulin to work better (good for diabetics, and others). And cinnamon and coconut oil both have shown some potential in addressing Alzheimer’s. So I figure they’re perfect (and healthy) for husbands, kids, and others to munch on as needed! Makes 12 servings or so.
INGREDIENTS
1 1/2 c. raw cashews
1 1/2 c. oatmeal (gluten-free if necessary)
1/4 c. coconut oil
1/3 c. honey
1/2 tsp. salt
1 tsp. vanilla
2 tsp. cinnamon
1 TBS. bee pollen
PREPARATION
1. Process the oatmeal into flour in a blender (or food processor). Use: > 1 1/2 c. oatmeal
2. In a hot, dry skillet, toast the oatmeal until golden and fragrant, stirring constantly.
3. Set toasted oat flour aside in separate bowl. On medium heat, toast cashews in iron skillet, until golden, stirring often. (Or toast in oven.) Use: > 1 1/2 c. raw cashews
4. Add cashews to a Vitamix (or other blender); process until fairly smooth. Add: > 1/4 c. coconut oil > 1/3 c. honey > 1/2 tsp. salt > 1 tsp. vanilla > 2 tsp. cinnamon
5. Mix the following in bowl, kneading some with hands to mix, as the dough will be very stiff. Use: > Toasted oat flour > 1 TBS. bee pollen > Blended ingredients
6. Press into loaf pan lined with wax paper, and chill until firm (about an hour) before cutting. Slice and wrap in wax paper; store in jar in fridge.
I was craving some Irish Soda Bread from a local bakery. Alas- too far away. Plus, we needed scones for a tea we were hosting at The New Deli. Result: This recipe, which can be varied in many ways to suit your mood or tastes!
The raisins in these scones add extra sweetness, and the caraway adds a perfect complementary flavor. For variety, substitute dried cranberries for the raisins, and 1/2 c. chopped walnuts in place of the caraway seeds. Orange or lemon zest is another nice addition!
INGREDIENTS
2 c. flour (or use part fine corn meal for more texture)
3/4 c. buttermilk (plus extra for sprinkling on top)
PREPARATION
1. Process in food processor until mixed: > 2 c. flour (or use part fine corn meal for more texture)> 2 TBS. sugar > 2 tsp. baking powder > 1/2 tsp. baking soda > 1/2 tsp. salt > grated peel of 1 lemon (or orange)
2. Add, then process in food processor until it resembles coarse meal: > 1/2 c. cold butter, sliced
3. Last, add and pulse-mix just until blended: > 1/2 c. raisins (or dried cranberries) > Optional: 1 1/2 tsp. caraway seed (or substitute 1/2 c. chopped walnuts) > 3/4 c. buttermilk
4. Roll out (or pat out), on floured board, into approximately a 9 x 13″ rectangle (about 3/4″ thick). Spread lightly with extra buttermilk; sprinkle w/ about 2 TBS. sugar. Cut into 6 squares, cutting through squares to make triangles. Bake on greased sheet, 1″ apart. Bake 10-15 minutes at 425 degrees. Makes 12 scones.
Some of us are cheering the benefits of Kombucha, but others are screaming. Apparently, it’s quite controversial, raising the hairs on some folks’ backs (Andrew Weil’s, for one). Kombucha seems to be eliciting gut feelings not necessarily founded by reason. On both sides of the fence!
If it works for you (like it does for me), great. I ferment my Kombucha long enough to convert most all of the sugar that was originally in it, and it’s done wonders. I haven’t been prone to colds and such all year! And I suspect it helped me lose the ten pounds I couldn’t shake for a few years, since it has been part of my new regimen.
On the other hand, I have a friend who can not tolerate the stuff, so it really isn’t for her. Try it and see?
If you do a word search, you’ll find many arguments on both sides. Some have found relief from Candida (even if they did experience some initial symptoms from “Candida Die-Off”). Other folks have found no such relief. Some claim it’s helped them “detox”, helping their bodies to get rid of toxic metals and such. Researcher Diann Dirks says it is “anti-aging, immune boosting, detoxifying, anti-cancer, liver cleansing… to name but a few properties.” Others cry, “blasphemy!”
There have been some technical glitches as to Kombucha’s exact biological makeup (they thought it contained one thing, because of the effect it had; then they realized it didn’t actually contain the thing they thought it did, etc.). I’m not sure it matters if the exact chemical makeup is completely accurate, so long as the results are! Eileen from Phoenix Helix dispels many of the myths, and cites plenty of sources in this article. Also, Jim of Culinary Tidbits explains that the saccharic acid in Kombucha helps the liver bind toxins to glucuronic acid (rendering the toxins harmless).
If you’re adventurous enough to try it, I’ve shared my own Kombucha Recipe, Easy-Style. I was able to get my starter from a friend, although you can even start some by brewing a quart or so, using an unpasteurized, store-bought bottle of Kombucha. (You can also buy a great SCOBY for making your own Kombucha, on Amazon, here.)
I was skeptical at first; I was so pleased with how my Kefir-brewing had been going. But my friend had a lot of positive feedback about her venture into making Kombucha, so I gave it a try. Now I’M sold!
I was a very enthusiastic kombucha brewer in the beginning. I envisioned mass quantities of the stuff being welcomed by throngs of New Deli employees and patrons. I bought a tea strainer the size of a man’s fist, got a whole case of blue, clasping-lid bottles, and had gallon jars of various strains of kombucha up on my top shelf.
Alas, it didn’t catch on. Most of the deli gang enjoys this Jun Kombucha more. It’s kombucha’s sophisticated, fancier cousin, brewed on green tea and honey; the “champagne” of kombuchas. I still drink “regular” kombucha daily though–it’s got its own unique probiotic profile.
I make my kombucha extra tasty by adding some “Ginger Bug” to the second ferment. Yay- ginger ale! (Find Ginger Bug Recipe here.)
I was like a new mother in my early kombucha days, so nervous about my scoby. I’d carefully decant all but a few cups of the last brew, remove the scoby, clean the container, add new sugar/tea mixture (plus some of the old “starter” brew), then put the scoby back in…
Now that scoby stays in the crock/jar/whatever. I pour off most of the fermented kombucha, add new sweet tea to the receptacle, and I’m done. “Continuous Brew Style”–so much easier!
As for what receptacle to use, well…I thought a crock or glass decanter with a spigot would be handy, to fill bottles for the second ferment right from the tap. No! This was not easier! What was easier was getting a funnel, and pouring the brewed kombucha off the top, into bottles. The spigot method was slower than I’d hoped, although I still like my spigot jars, if only for pouring a bit of kombucha into a tasting cup, so I can determine if it’s “ripe” enough. So…use whatever works for you–a spigot jar, crock, or regular jar! I personally use a 2-quart square jar, so it takes less counter space. The 2 1/2 gallon crock might be too large for many of us..
SWEET TEA DIRECTIONS
Get some starter and scoby from a friend, or let a scoby develop on some store-bought, unpasteurized kombucha. OR, get this starter from Poseymom.
I speed up the brewing process when making sweet tea by brewing the tea in half-as-much boiling water, adding the remaining liquid in the form of cool water or ice-cubes. (I’m a lady-on-the-run and don’t want to wait for tea to cool off!)
INGREDIENTS
4 c. filtered or spring water (not chlorinated tap water)
4 black tea bags or 1 TBS. loose black tea (or substitute green or white tea bags ocassionally)
Optional: Extra tea for flavor (rooibos or yerba matte, etc., but no Earl Grey)
1/2 c. sugar
4 c. more cold water and/or ice
Bring to a boil: > 4 c. filtered or spring water (not chlorinated tap water)
Pour boiling water into jar or tea pot with the tea in it, to brew for 3 or 4 minutes. Use: > 4 black tea bags or 1 TBS. loose black tea (or substitute green or white tea bags ocassionally) > Optional: > Extra tea for flavor (rooibos or yerba matte, etc., but not Earl Grey or citrus teas, as the oil in them inhibits scoby growth)
After the sweetened tea has cooled off,strain the tea out into another jar/receptacle.Add, stirring in until mixed: > 1/2 c. sugar (Not honey or raw sugar- that will inhibit growth)
Also additional liquid. Use: > 4 c. more cold water and/or ice
When the sweet tea is cooled off, add to the gallon jar or crock that contains about 1 c. starter tea, plus the scoby.
Initial brewing may take 7-14 days. It will go through stages as the sugars convert. Early on, they break down into easier-to-digest sugars that actually taste sweeter, even though there is now less sugar in the brew.
The kombucha will be ready for its second ferment when the liquid is pleasantly tangy, but not too sour. If the kombucha gets neglected for too long, it will turn to vinegar. Kombucha that’s gotten pretty sour can still be used to make a second ferment, but will need considerably more juice to tone it down!
Continuous brews can yield finished kombucha after a week or so, depending on weather. (They finish faster in warm weather.) Then they can be decanted into bottles for a second ferment (which will take a day or two to get bubbly).
CONTINUOUS BREW METHOD
Add sweet tea to kombucha starter. The more starter tea there is in proportion to sweet tea, the quicker it will ferment. If more sweet tea is added to just a little starter, it will take longer to ferment. This info can help with “Kombucha Management”!
After about 7 days, the first fermentation’s probably finished. You might wait longer (taste it now and then). Don’t go too long, or it’ll become an undrinkable vinegar concoction!
Pour off some of the kombucha into bottles, for the “second ferment”. What remains will stay in the brewing receptacle; it’s the “starter” that will help the next batch along.
Add cooled, sweetened tea back into the crock/jar. After a week or so, check the next batch every few days, looking for that characteristic tang that’s not too sweet, not too sour. Continue the process, bottling some for a second ferment, or even just drinking it straight from the tap.
Replenish the crock with more sweetened tea. Rinse and repeat! Except, I don’t actually rinse my stuff except maybe once every six months or so.Then I strain the starter tea to remove the kombucha “debris” that collects, rinse the jar out, and keep going.
The beauty of the continuous brew method is that there is so much of the fermented kombucha in the crock, that when you add a quart or two of new sweetened tea on top, it gets fermented pretty quickly. In several days or so you can decant more. (Go by taste- it’ll depend on warmth, and your preferences.)
TIPS FOR KOMBUCHA SUCCESS
TEMPERATURE:If temperatures soar into the nineties for your Kombucha brew, that could potentially make it die off. In temperatures lower than the ideal 72 to 85 degrees, your scoby might just hibernate some. In that case, at least it will start regenerating once it’s brought back into a warmer climate. If your kitchen is just too cool, you might want to look into a heater strip (click on the one on the right, if you want to buy it on Amazon). I’ve put my kombucha crock on top of the fridge, using an old heating pad under several towels to warm it up some- that also works!
BLACK TEA IS BEST: The “Scoby” (“booch”, as it can be affectionately called) needs to (ideally) brew in a medium containing black tea. I have tried green and white teas (all from the same plant), but the scoby seemed to weaken after several ferments using only those teas. I’m sticking to black, which has all the right properties. Some additional rooibos or yerba mate can be added to that as well, for extra nutritional benefits, if you want. But keep adding black tea.
Annabelle of Kombucha Fuel gives a complete run-down on teas to use, from black to green, white, yerba mate, rooibos, herbal… (article here). Someone in the comment section there mentions using Puuerh tea, but from my research, it doesn’t sound like a good idea…
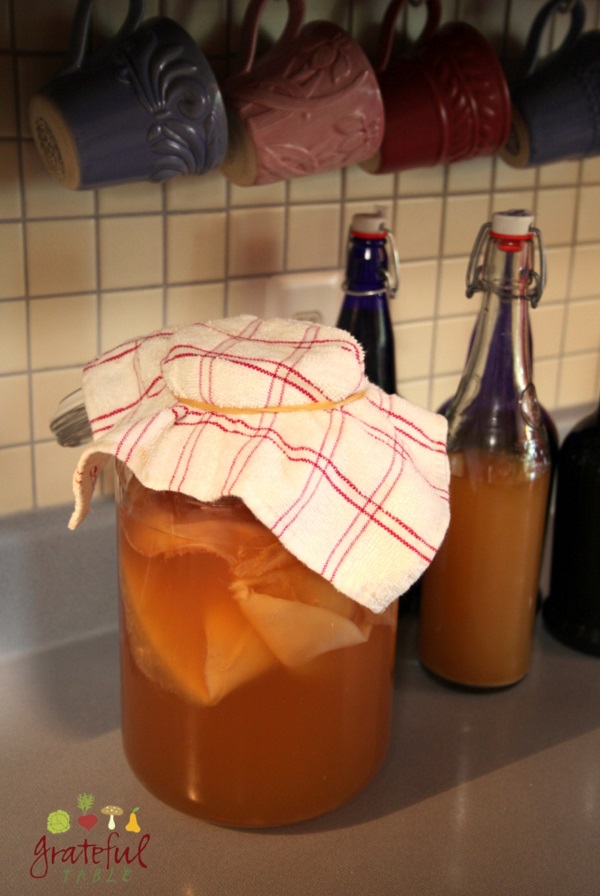
NO CHEESE CLOTH: Use a towel or such for covering the kombucha as it brews- this will keep out fruit flies, mold spores, and such. (Cheesecloth isn’t a fine enough weave to work well.)
NO MOLASSES: Don’t add molasses. It’s great for kefir, but folks say it gives kombucha a weird taste.
BOTTLES: I’ve been pouring a new batch of tea right into my gallon jar, decanting some right away into one of these blue bottles with the ceramic stopper. The kombucha will finish brewing in the bottle, building up carbonation along the way. (Add fruit juices or spices for flavoring, to make it like healthy soda!)
SCOBY HOTEL: You might want to house some spare scobys in their own “hotel”, in case the one you’re using goes south. (Like, gets black mold on it or something- definitely a bad sign.) The “Hotel” is just a gallon jar filled with kombucha; you add the older layers of scobys to it, and they’ll keep almost indefinitely. Eventually (every two to six months), the brew will collect an excess of yeasts- those brown tendril-like clumps floating around in the liquid. So, set the scobys aside and strain the liquid out of the jar, through cheesecloth, to catch the excess yeast. Clean the jar out well, as dead yeasts build up on the bottom of the jar. Then return the scobys to the clean jar, and fill it half with the strained kombucha, and half of some new sweet-tea brew. Good for another six months or so!
There are ideas for using extra scobys in spa applications- see this article from Kombucha Kamp. In my experience, the spa idea was horrible. Another idea: let it dry out, then give to your dog as a “jerky” of sorts. Another horrible idea, at least for my dog! (She just stared at it. Not impressed.)
CROCKS ARE DISCREET! If you need to brew extra big batches, this is for you. And other family members don’t have to be too concerned about the strange “growth”…
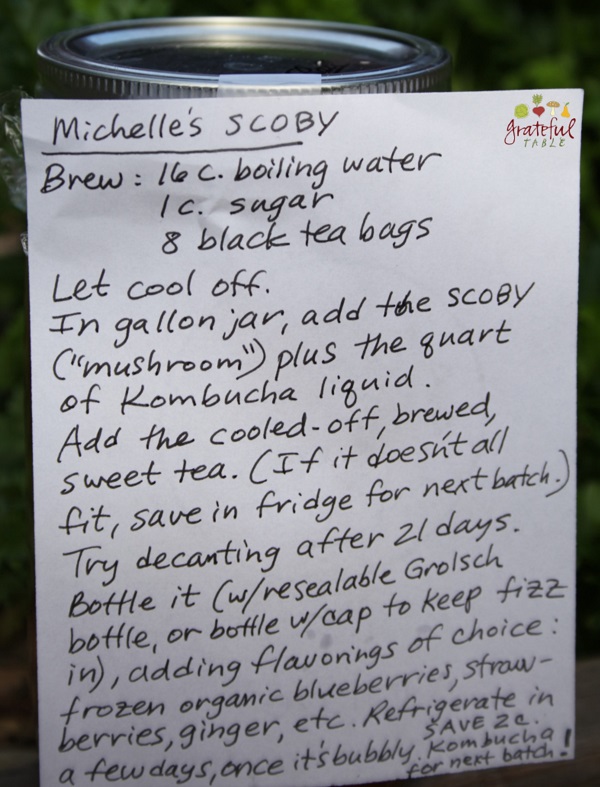
Below is a picture of the jar I gave to my friend. Note how bashful the SCOBY is- hiding behind the note, haha!
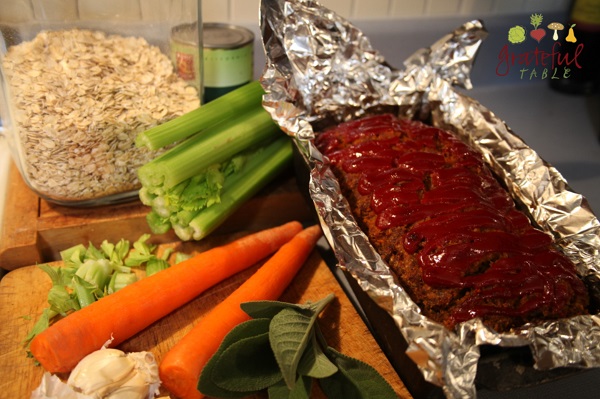
Make this with hamburger (94% lean is good), or organic, grass-fed beef, or ground turkey- your choice! It’s full of flavor, and keeps well.
Save steps by making a “seasoned oat flour*” (directions at bottom of page). Use the seasoned oats when making meatloaf, but also in place of flour when dredging chicken (more flavor, and healthier than white flour).
Although bread crumbs (bought or homemade) are a traditional ingredient in meatloaf, this recipe puts whole grain oats to use—more economical and wholesome than the former. This recipe makes one meatloaf, serving 8-9 people.
1/4 c. “1000 Island Mix” (or substitute tomato paste)
2 lb. lean ground beef (94% lean is good)
Ketchup for top
PREPARATION
1. In a food processor or blender, process until fairly fine: > 1 c. oats> 1 1/2 tsp. salt > 2 tsp. dry, ground sage > 2 TBS. dry onion flakes* (or sub rounded 1 c. of “seasoned oat flour mix” for these dry ingredients)
2. Add and also process, until well-chopped: > 1-2 med. carrots, in chunks > approx. 2/3 c. celery and leaves, in chunks > 2-3 cloves fresh garlic
3. Add to a bowl w/ the following: > 1 egg > 1/4 c. “1000 Island Mix” (or substitute tomato paste) > 2 lb. lean ground beef
4. Line a 9″ loaf pan with heavy-duty foil, then press mixture in. Use fingers along edge, to push the mix down around edges (this makes room for water to be added). Pour about 1/3 c. water around sides of loaf; it will seep down, keeping the bottom moister.
5. Top w/ketchup. Bake at 350 degrees for 1 hour 20 minutes. (If microwaving in a glass loaf pan, it will take around 18 minutes at medium-high-power.
6. Serve warm or let cool for meatloaf sandwiches later in the week! Slices can even be wrapped individually and frozen, to be used as needed.
SEASONED OAT FLOUR MIX
If you make a lot of meatloaf, and also like having a seasoned oat flour for dredging chicken (a nice substitute for the usual white flour), you can make this larger recipe of “seasoned oat flour”. It’s a lot easier to use a rounded cup of this mix in place of the first four ingredients in the meatloaf recipe. We do this at The New Deli- it does save time!
Just process the following together, then store in half-gallon container, ready to use in meatloaf or other dishes: > 6 c. oats > 3 TBS. salt > 1/4 c. dry, ground sage (or 1/3 c. cut and sifted dry sage) > 3/4 c. dry onion flakes
Lamb can be a welcome change from typical roasts; perfect for special occasions. This lamb recipe is big on flavor, presentation, and economy; Leg of Lamb is usually better-priced than other cuts.
With some prep done ahead of time (like roasting the red peppers before-hand), it’s not too much work all at once. The whole recipe could be prepared the day before and refrigerated, then roasted on serving day; in such a case, the overnight chilling may make it take a bit longer to cook.
Serves 8 or so, depending on size of lamb, and appetites.
INGREDIENTS
4 to 5 lb. leg of lamb, boneless*
6 or so red peppers (or 1-2 c. roasted red peppers)
4-5 med. lg. carrots, peeled
1 bunch of Swiss Chard (or substitute 6 oz. spinach)
1/2 c. or so of diced onion (half of one small onion)
2 large garlic cloves, minced
1/4 tsp. cayenne pepper
1/4 c. parsley
1/4 c. fresh rosemary and mint, if available
1 c. chicken stock
PREPARATION
1. Ahead of time, prepare roasted red peppers. Roast in iron pan, at highest oven temperature: > 6 or so red peppers (as many as might fit in the pan)
2. Check them every 20 minutes or so. As the tops get slightly blackened, turn them to get the other sides cooked as well. When skins have darkened, set the pan aside to cool. Remove skin and seeds when cooled.
3. Set red peppers aside.
4. Also ahead of time, pre-cook the carrots, by steaming or microwaving until somewhat tender. Set the cooked carrots aside. Use: > 4-5 med. lg. carrots, peeled
5. Prepare the Swiss Chard by removing the tough inner rib (or substitute spinach): > 1 bunch of Swiss Chard (or 6 oz. spinach)
6. Also ahead of time, prepare a seasoning spread of the following, mixed together and set aside: > 1/2 c. or so of diced onion (half of one small onion) > 2 large garlic cloves, minced > 1/4 tsp. cayenne pepper > 1/4 c. parsley > 1/4 c. fresh rosemary and mint, if available
7. Prepare the lamb. Use: > 4 to 5 lb. leg of lamb, boneless
8. Open the fatter parts of the lamb up by slicing cross-ways, almost all the way through, spreading the “butterflied” piece open. Pound the meat until flattened, with a meat-tenderizing hammer.
9. Spread the pounded, butterflied lamb with: > The seasoning spread (of the chopped herbs/garlic)
10. Add the following ingredients onto the lamb in layers: > The trimmed Swiss Chard (or spinach) > The cooked carrots, left whole > 1-2 c. roasted red peppers, wrapped around the carrots
11. Starting with the smaller end, start rolling the lamb up, and tie it with kitchen string. Roast at 325 degrees for about 1 1/2 hrs. (to 130 degrees internally, when tested with a meat thermometer). Let stand 15 minutes before cutting. Add the following to the drippings in the pan, making au jus: > 1 c. chicken stock
12. Serve the lamb with a simple side dish of rice or red potatoes, and perhaps a sprig of spearmint or rosemary. Also popular: A little side dish of spearmint jelly.
*If boneless leg of lamb is not available, it’s not too difficult to cut the meat off of a semi-boneless leg of lamb. Even if it ends up as two pieces, it still all gets tied together and works out anyway.
I didn’t want to spend hundreds of dollars monthly on a weight loss system. When my friend told me the monthly cost of the TR90 weight loss plan, I gagged! Then I researched. (What all was IN their products?!) (See my findings here.)
THEN, I searched for the best prices on the raw materials I’d need to somewhat duplicate the TR90 product (hopefully at a better price). Although theirs contains fructose, I didn’t add that. I don’t believe a refined sweetener like fructose will help me lose weight, although I’m sure manufacturers like to put such low-cost additives in their mixes- boosts their profits, and tastes more additively sweet to customers. (Arg!)
But I did decide to try out whey protein, which was a key ingredient in many “diet” mixes. The only other protein powder I’d ever tried was a soy-based one, back in the eighties. That was long before all the stir about genetically modified soy crops, and the other issues with soy. To mention a few: Soy contains phytoestrogens (which can disturb hormone balance). And, like any other bean proteins, the phytic acid soy contains can affect our ability to absorb other nutrients. Also, soy is a goitrogen (so it’s bad for those with thyroid disorders). And it contains protease inhibitors too (which block certain digestive enzymes).
I have not been keen on taking any products containing soy (I even steer clear of pea protein and such). But whey? This sounded interesting. I’d never tried it, though the young men in this household tank up on the stuff for their body-building regimens.
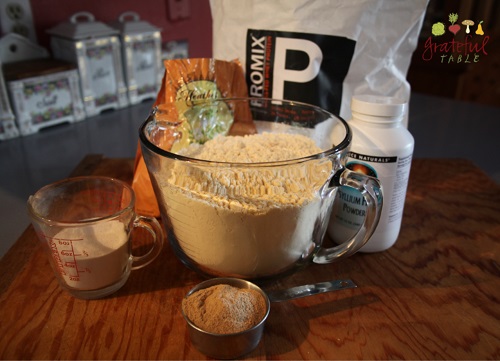
To begin my new regimen, I knew I wanted a plain whey protein, so I wouldn’t be paying for the cheap sweetener and other questionable ingredients many companies like to add. I ordered this 2-lb. pkg. Organic Whey Protein. It was quite an investment at $33/lb.- yipes! And Mark (of Mark’s Daily Apple), doesn’t think you need organic whey, since chemical/pesticide residues won’t be found in the whey itself. I still like the organic stuff though. I’ve since ordered a larger size of the same product, more simply labeled, but still from the same company, called ProMix Grass Fed Whey Protein – 5lb Bulk Bag. It’s just $15-20/lb.- such a deal for a quality product.
If you’re “sheepish” about ordering five whole pounds of something you’ve never tried before, you can get this decent product instead: Jarrow Formulas Whey Protein; it’s a more economical brand, just $14.99/lb., but you do have to get two pounds to get the better price. Like the stuff I get, it’s also unflavored and low-heat processed, which preserves the “lipolic conjugated linolic acids” (these help us produce Glutathione, which helps destroy free radicals).
glutathoine. (Glutathione can help with mercury detox; this Mercola.com post has a lot of ideas for that project!)
Having looked at the ingredients in the expensive diet mixes, I realized I could easily add a few of them to a base of whey protein powder, at a cheaper investment. For the main blend, I mix in some Acacia Senegal (“Heather’s Tummy Fiber”). I use about 1 TBS. per cup of whey powder. It soothes the stomach and promotes good gut bacteria. (And I think it helps me to not feel too hungry.)
I also add 1 TBS. Psyllium Seed Powder, per cup of whey protein. It’ll add some bulk (from the husk fiber), but also, the prebiotic, fermentable fiber that the whole-seed powder contains will feed/support gut flora. As if that’s not enough, psyllium seed powder can help us produce more beneficial short chain fatty acids like butyrate (discovered in this study being tried on colon cancer patients).
I had used larger quantities of psyllium HUSK powder (not the whole-seed stuff), back when I was pregnant (over 30 years ago), and when my un-diagnosed thyroid problem was so bad– it helped with constipation. The smaller amount of the whole-seed powder I use now is more of a nutrient than a laxative. Ideally, with improved health comes improved digestion, so you don’t need laxatives to be regular.
A handy time-saver is to add several favorite herbs and super foods to one giant mix. Much easier than adding a little this and a little that to every shake. For my first smoothie of the day, I use a “Fruity Mix“, so I can be sure to get those extra nutrients that certain superfruits and herbs contain. It mixes easily into my morning smoothie. Very handy, and super-delicious. Well, unless you’re used to pizza and chocolate bars for breakfast!
Just for the record, I was not that woman. You know, the one at the store with the gloves and face mask on. (Though I’m not knocking it, mind you.)
And I’ve never been one to bring my glass jars of food to work, instead of a convenient plastic container.
I was never the one packing all my bulk health food supplies into brown paper bags instead of the handy plastic ones.
But I’m getting a lot closer to being that woman! I’m discovering there is a certain cocktail of chemicals at work in our environment, assaulting our bodies to hormone-disrupting effect. There’s a name for this stuff: “eEDCs” (or EDCs)–estrogenic endocrine-disrupting chemicals. This is a fairly new term. A word search reveals little on the subject–mostly articles by researchers. But I bet this term will be more prevalent as time goes on.
What does it mean to have your hormones disrupted? For one, it might mean weight gain. Other effects: Genital abnormalities, early puberty, reproductive and fertility problems (including decreased sperm count and quality). The immune system might be affected, or behavior; even brain health. A link between EEDCs and cancers (especially of the reproductive system) has been noted; even a connection to diabetes. EEDCs seem to be especially dangerous for children and pregnant women.
So how do we avoid them?! We can get exposed though plastic food packaging (yes, they can leech into food, especially when heating the package). Most everyone now knows to avoid plastics containing BPA (one of more well-known disruptors), but there are many other chemicals in plastics (though not as well-known), that can cause just as much damage.
BPA is also found in receipt tape. In the case of receipts, the BPA is not bound to a plastic molecule, so it can easily pass from the receipt to your skin, and on to your food. I’ve always been a stickler about washing hands real well after shopping; now I see that my concerns were totally justified! It is wise to avoid putting your hands to your mouth after handling receipts- wash those hands real well, first!
Pthalates are another EDC, found in many beauty products (nail polish, shampoo, hair spray). Check your labels! Is it any wonder that many of us have begun to seek out the simplest, handmade-style soaps (with real short ingredient lists)? I even began washing my hair with an all natural bar soap for hair; my hair is at least as nice as it ever was using other products. I was actually just tired of buying watered-down soap (i.e. shampoo) in plastic bottles that would probably just end up polluting a landfill (or worse). Turns out, bar soap for hair is actually good for me, too! (I’ve also started using “Soap Nuts“; a natural way to get laundry clean with no chemicals. They’re even more economical than regular laundry soap!)
Not to drag anyone down; I don’t mean to freak you out about all these issues. But for those of us who feel like we took real good care of ourselves and still ended up with health conditions, these are some points to consider. No matter how well we think we’re taking care of ourselves, if we are unaware of the effects of certain contaminants in our environment, we ought to get informed!
Some of us already might have heard about more EEDCs being found in our water supply. What’s in your glass of water? Maybe some estrogens (from animal husbandry/agriculture); maybe some prescription drug residue. Maybe even some industrial pesticides, that also disrupt hormonal activity (and might cause breast cancer). Time to look into water filters! I love my Berkey water filter; thankfully, it removes chlorine too. Chlorine can destroy helpful gut bacteria, and in our water supply, it can combine with organic matter, forming chloroform. Not a great chemical to be constantly exposed to!
While we’re covering all the places EEDCs might be found, we should consider food, as well. Dioxins, PCBs, and heavy metals are of concern, since they tend to get stored in our fat tissues for years. They can mess with the endocrine system; plants, fish, and animals absorb these toxins when living in contaminated areas, and that passes along to us.
Environmental toxins are another source of EDCs. VOCs are found in various household products and cleaning chemicals (paints, solvents, preservatives, cleaning products, air fresheners, and craft supplies). I’m finding more friends who can’t walk down the laundry soap aisle, or who react to that person dowsed with a heavy waft of perfume. Even air fresheners can assault the system. Consider that air fresheners don’t really “freshen” the air; they only disguise it. Eventually, the nose doesn’t register that overpowering “fragrance”, but the chemicals are still working against our system. I’ve switched to beeswax candles, which have a natural smell that doesn’t mess with my endocrine system!
You’ve probably heard of the dangers of asbestos (yes, let’s avoid that!), but another problem is PBDEs, found in things like polyurethane foam, and some electronics. That’s one extra point for goose-down pillows!
It’s not really a huge deal- you might be like me, and just start gradually making a few changes. I’m using more glass containers for various foods now, and I get organic produce as much as I can. I wash my hands after handling receipts, eat wild-caught salmon, and use Dr. Bronner’s soap. I’m cleaning more often with vinegar and such. I’m not wearing gloves and a face mask, but I’m feeling all right.
I’m rounding up favorite recipes for the brunch we’ll be having for our annual Easter Egg Hunt. Thought I’d share this one with you! Even though I don’t use much flour these days, in this particular case, the flour helps the dish to hold up, and to cut easily into small serving pieces. For gluten-free, check the note below on making the frittata “omelet-style”.
This simple recipe is good for serving a crowd, when one doesn’t want to deal with last minute preparations. A bit of flour in the mix helps the dish hold up. Packaged, grated cheeses are convenient, but cost a bit more, and the choice of cheese is limited. An alternative to grating: slice through a chunk of cheese, stack it and cut through it again to get smaller pieces. It works just as well as the grated cheese.
Fancy chefs may like making their frittatas more like an omelet is made, as the eggs cook just the right amount, and the toppings are broiled, with bubbly, melted cheese. For that method, eggs are whisked with a bit of water, and added to a hot, oiled skillet. The cooked layer is lifted to the top with a spatula, and fillings of choice can be layered on next, with cheese on top. The whole pan then gets broiled until the cheese is bubbly. A glorified omelet, really, but it looks especially appetizing with the broiled cheese on top.
This frittata recipe serves 4-6 as a main dish, or more as an appetizer.
INGREDIENTS
8 oz. Jack cheese or other favorite, divided in half (about 2 c. grated)
6 eggs
12 oz. Ricotta cheese
One 8 oz. bag frozen spinach
1 c. or so grated Jack cheese
1/3 c. flour
3/4 tsp. baking powder
1/2 tsp. black pepper
1/2 tsp. salt
3 or 4 tomatoes, sliced
PREPARATION
1. Prepare cheese by grating (or slicing/chopping): > 8 oz. Jack cheese, divided in half
2. Reserve approx. half of grated cheese for the top layer. Mix well: > 6 eggs
3. Add to eggs in bowl: > 12 oz. Ricotta cheese > One 8 oz. bag frozen spinach > approx. half of the grated cheese > 1/3 c. flour > 3/4 tsp. baking powder > 1/2 tsp. black pepper > 1/2 tsp. salt
4. Mix well. Pour into buttered 13×9″ dish, and top with: > 3 or 4 tomatoes, sliced
5. Last add: > Reserved grated cheese
6. Bake at 375 degrees for 30 minutes, until golden on top. Serve warm or at room-temperature. Cut into smaller pieces to serve as an appetizer.
VARIATIONS
Artichoke Frittata
Omit spinach and salt. Substitute: > Three 6.5oz. jars marinated artichoke hearts, drained (or 1 bag frozen artichoke hearts plus 1/2 tsp. salt)
Green Chile Frittata
Omit spinach and Jack cheese. To serve, top w/cilantro. For frittata, substitute: > Two 7 oz. cans green chilis, drained > 8 oz. Cheddar cheese, grated
 Mexican papayas are becoming easier to find. They aren’t quite as sweet as Hawaiian papayas, but they’re also less likely to be genetically modified. They might be a little uglier on the outside too- often a mottled brown/green/orange color. But this colorful fruit is especially healthy, fighting inflammation, promoting heart health, and aiding digestion.