Latest Recipes

Fun Kid’s Birthday Party: “Spaghetti and Meatballs” Cupcakes

My friend loaned me her “Hello Cupcake” cookbook. What fun that was! I browsed through the whole thing, but realized that most of the cupcakes were far too elaborate to meet my time constraints.

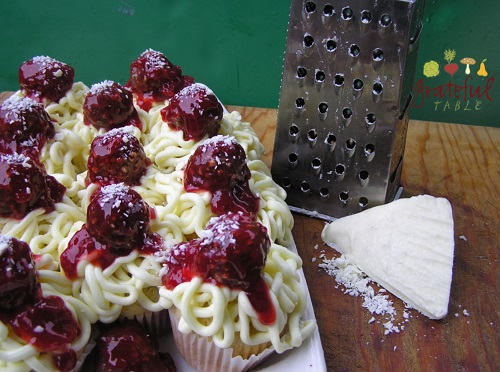
So I narrowed down the list, and settled on making the Meatball Cupcakes for my son’s birthday. He was turning 21, but his favorite candy is Ferrero Rocher, so it just seemed so right!

I made a few changes in the book’s recipe. Homemade frosting would be way cooler (for a number of reasons), right? I used some olive oil in the cake too (although it could be made with all butter). One thing I didn’t change: Using low-sugar raspberry jam for the “tomato sauce” (it has more color than other jams).

Enjoy making this for your next kids’ party- young or old! Makes 2 dozen cupcakes, with some extra frosting left over.

Fun Kids Cupcakes

INGREDIENTS

  • 1 stick (1/2 c.) soft butter, plus 2 sticks (1 c.) for frosting
  • 1 c. sugar
  • 3 eggs
  • 1/2 c. milk
  • 1/2 c. olive oil
  • 1 tsp. vanilla (plus 1 tsp. for frosting)
  • 2 1/2 c. flour
  • 2 tsp. baking powder
  • 1/2 tsp. baking soda
  • 1/2 tsp. salt
  • 8 oz. cream cheese, room temperature
  • 2 1/2 lb. confectioner’s sugar (8 1/2 c. or so)
  • Yellow food coloring
  • 15 oz. jar low-sugar strawberry jam (better color in low-sugar jam)
  • 1 bar white chocolate (3 oz. or so)
  • 24 pieces Ferrero Rocher candy
  • 2 zip-lock bags (large, freezer-quality)

PREPARATION

1. Prepare muffin tins using cupcake liners (or butter tins). Beat on high until light: > 1 stick room temp. butter (1/2 c.) > 1 c. sugar

2. To creamed butter/sugar, add, mixing after each egg: > 3 eggs

3. In separate bowl, mix dry ingredients:  > 2 1/2 c. flour > 2 tsp. baking powder > 1/2 tsp. baking soda > 1/2 tsp. salt

4. Using whisk attachment (or hand-folding), gently mix dry ingredients into the creamed sugar/butter/egg mixture. Add just some of the dry ingredients at a time, alternating with the milk/oil/vanilla mixture.

5. When mixed together, spoon the batter into a large (freezer quality) zip-lock bag. Snip a small corner off (1/2″ or so), and squeeze the batter into the muffin liners. Bake at 350 degrees for 15-20 minutes, until a toothpick comes out clean and cupcakes are set. Let cool on a rack. Arrange on platters, ready to frost.

6. Ahead of time (even a day early), melt white chocolate 1 minute or so in microwave, pouring into the corner of a loaf pan (or similar), lined with plastic wrap, in order to make a little “wedge” of parmesan cheese. Use: > 1 bar white chocolate (3 oz. or so)

7. (You can forego the above “parmesan” instructions if you can find a chunk of white chocolate.)

8. Meanwhile, make frosting. Microwave 1 minute or so: > 2 sticks (1 c.) butter

9. To melted butter, add and microwave 1 minute more, to get soft: > 8 oz. room temperature cream cheese > 1 tsp. vanilla > several drops yellow food coloring

10. To a mixing bowl, add: > 2 1/2 lb. (about 8 1/2 c.) confectioner’s sugar

11. Add to the confectioner’s sugar in bowl: > The melted butter/softened cream cheese/vanilla/yellow food coloring

12. Beat all frosting ingredients, slowly at first, then on higher speed until creamy and smooth. If necessary, add a bit more yellow, to make a “noodle” color frosting. Spoon the frosting into a zip-lock bag. Cut a small hole out of one corner, and start piping the frosting out onto the cupcakes, piling it on each cupcake like a small pile of noodles. Refrigerate some to firm up frosting.

13. For “tomato sauce”, warm jar 1 minute or so: > 1- 15 oz. jar low-sugar strawberry jam

14. Roll in some of the melted jam, to coat: > 24 Ferrero Rocher Hazelnut Candies

15. To the tops of cupcakes, add one “meatball”, spooning extra jam on as needed for “sauce”. Sprinkle with a touch of grated white chocolate (for “parmesan”). And enjoy!


Sourdough Bread Recipes: Whole Grain Raisin Rye Bread

This whole-grain bread recipe is somewhat dense, and full of flavor. A hearty addition to a meal! Use it with a sourdough starter, for a more wholesome food that’s easy on the digestive system. (Some celiacs even claim they can eat homemade sourdough bread.)

Use more whole wheat flour for better rising, or more rye flour for a denser loaf. Fresh flour from whole grains is the best, easily ground in a minute and a half in a Vitamix (though other grinders are fine). If that’s not an option, store-bought “whole wheat” will do. It is often just all-purpose flour with bran in it; it won’t be quite the same, but it will still pretty good!

Makes one small loaf, for 6 or so.

Grateful-Table-Sourdough-Raisin-Rye-BreadINGREDIENTS

  • 3/4 c. or so starter
  • 1c. water
  • 1 c. whole wheat flour
  • 1 c. rye flour
  • 1 1/2 tsp. salt
  • 1 1/2 tsp. caraway seeds
  • 2 TBS. molasses
  • 2 TBS. cocoa powder
  • 2/3 c. raisins

PREPARATION

1. To 3/4 c. or so starter, add: > 1c. water > 1 c. whole wheat flour > 1 c. rye flour

2. Let double (up to half a day or so), then add: > 1 1/2 tsp. salt > 1 1/2 tsp. caraway seeds > 2 TBS. molasses > 2 TBS. cocoa powder

3. Knead 9 minutes, adding flour as necessary , then roll (or pat) into a rectangle, about 1/4-1/2 inch thick.

4. Sprinkle with: > 2/3 c. raisins

5. Roll up like a jelly roll, shaping some into a round. Let rise overnight, or several hours, until doubled.

6. Bake in an iron pan (or pan of choice) at 375 degrees for 20 minutes or so.

Easy Sourdough Starter Recipe: Pineapple Juice, Wheat, Water

Sourdough Starter Using Pineapple JuiceThis is the sourdough starter recipe that worked for me I love making this bread with my starter. (Or use it for any fave recipe, like this whole wheat bread or this wheat/rye raisin bread). My friend Joanna didn’t have to resort to using pineapple juice for her original sourdough starter, but then, she lives ten minutes closer to San Francisco. Could that be why hers was easier to come by?

My first batch had failed, so for my second attempt, I took ideas from several places (like, here and here), and combined them into what I thought was an easy recipe for success. It worked.

I had liked the idea of 100% whole wheat, but in that first week, while the starter is still maturing, one has to dispose of half the starter each time it gets fed. So I mainly used quality all-purpose flour for that, from the health food store. It saved me time and resources, as I didn’t have to fresh-grind my wheat berries into flour, for a mix that would (partly) be thrown out.

What was the reason for using half whole wheat flour and half all-purpose flour for the initial mix? Because, the whole grain flour actually has more wild yeasts in it (and other things too). So there’s a better chance of introducing those wild yeasts, when starting out. But switching to white flour afterward makes sense too, as the white flour provides all the necessary starch for “feeding” the wild yeasts that have been cultivated.

Some experts claim that by using whole wheat flour the whole time one is cultivating the initial starter, other organisms will continue to be introduced too, as whole grains are a source for many different microorganisms. But we’re aiming for the culture of the yeast and lactobacillus bacteria, so we don’t want to introduce too many others along with that. Hence, the white flour feedings.

The whole sourdough starter process will take a week to mature. The initial mix may take 1-3 days to begin bubbling. If the starter does nothing by the third day, throw it out and start over.  Be aware that certain grinders make the flour too hot, killing the yeasts. My Vitamix  grinds 3 cups of wheat berries in a minute and a half, but the flour became quite warm to the touch. So I use frozen wheat berries, to resolve that issue. 

After culturing this starter for a week, it will make a scant cup or so of starter. After it gets “fed”, half is refrigerated for the next project, and half is used to make a loaf of bread.

INGREDIENTS

1/4 c. pineapple juice (canned or from concentrate is fine)

1/4 c. all-purpose flour (organic, if possible)

1/4 c. fresh, home-ground whole wheat flour (or from a reputable supplier)

1-2 lb. more all-purpose flour, for follow-up feedings

Spring water (non-chlorinated), for follow-up feedings

PREPARATION

1. In a glass measuring cup (2-4 cup), or other bowl, mix together: > 1/4 c. pineapple juice (room temperature or slightly warm) > 1/4 c. all-purpose flour (organic, if possible) > 1/4 c. fresh, home-ground whole wheat flour (or from a reputable supplier)

2. Cover the container with plastic wrap and let sit. A warmish spot, at anywhere between 65-80 degrees should work.

3. Stir the mixture several times daily.

4. Note when the mixture starts to get a bit bubbly. It’s working! This should happen at some point in the first three days.*

5. When the mixture has gotten bubbly, and has doubled in size, it is ready for its “feedings” to begin. First, mix in the water: > 1/4 c. spring water (non-chlorinated)

6. To the water/starter mixture, add: > 1/2 c. all-purpose flour

7. Cover the container with plastic wrap and let the mixture double in size.

8. When it’s doubled in size again, start throwing half of it out. Even if it hurts. I hate to “waste”, but the starter is gaining in momentum. It’s still not matured, but if you kept all the premature mix, you would have too much.

9. After throwing half the starter out, feed again. Mix in: > 1/4 c. spring water

10. To the water/starter mixture, add: > 1/2 c. all-purpose flour

11. Keep repeating this process of letting it double, throwing half out, and feeding again, for one week.

12. After a week, you can start feeding it with freshly-ground whole wheat flour, if desired. Begin making bread with it, reserving half the starter in a jar in the refrigerator, and using the other half.

Note: I use red winter wheat berries (found here on Amazon for a good deal), for my whole-grain bread making. Delicious, and healthy!


Zucchini Soup Recipe (Putting that Garden Produce to Work!)

You’re practically looking at my latest Zucchini Soup recipe, in the picture below. It was SO EASY to make, using some of the garden surplus I got from a friend. (We all get extra zucchinis from “friends” this time of year, right?)

Grateful-Table-Artichoke-Garden-Soup

And I had some frozen artichoke hearts from Trader Joe’s. You did know about those, didn’t you? They’re reasonable priced, and their texture is much better than that of their canned friends. Plus, the canned ones usually have extra ingredients (salt, and sometimes a weird marinade). Such a product might substitute in this soup, but I prefer the unadulterated, frozen ones.

If you want to go to the extra work, you could use fresh artichokes. I didn’t, but I’m still taking the last few photos for the Soups’ On cookbook, so I had to throw an actual fresh artichoke into the picture for aesthetics’ sake. But I really didn’t want to go to that much work.Sneak-Preview-Jens-Soup-E-cookbook

So this recipe was perfect!

I had gotten inspired by a recent trip to the Stinking Rose. And even though we WERE the stinking roses, for a day or two afterward (garlic fumes emanated from our pores for a good while), I was inspired to roast some garlic of my own. And put it into a recipe.

I didn’t want to go to too much bother though. Some folks roast the whole head of garlic, skins on and all. Then they squeeze the soft, roasty garlic “meat” out onto bread and such. But I just peeled several cloves and stuck ’em in the slow cooker with a large zucchini, and let them roast/stew/cook for 30 minutes or so.

Then I just pureed all that with some thawed, frozen artichoke hearts, some olive oil, and some salt. I added a bit of my homemade chicken stock too– it was awesome!

Artichoke Garden Soup

Zucchini is elevated to new heights with the addition of artichokes and garlic. It adds body to the soup, allowing the other flavors to come through. It’s an easy soup; serves 4-6.

INGREDIENTS

  • 4 c. zucchini, in chunks (about 3-4 standard sized)
  • 3 cloves fresh garlic
  • 1 c. chicken stock or water
  • 1 1/2 c. frozen artichoke hearts (about half of a 12-oz. bag)
  • 1/4 c. virgin olive oil
  • 1/2 tsp. salt
  • Optional: green onion or chopped herbs for garnish

PREPARATION

1. Use slow-cooker or other favorite pot to steam zucchini and garlic until tender, about 30 minutes. Use: > Approx. 4 c. zucchini, in big chunks > 3 cloves fresh garlic > 1 c. chicken stock or water

2. When zucchini and garlic are cooked, add: > 1 1/2 c. frozen artichoke hearts, thawed > 1/4 c. virgin olive oil > 1 tsp. salt

3. Let all the ingredients heat up, then process them in a blender, food processor, or with an immersion blender, until smooth. Add enough boiling water (or extra stock) to make it the right consistency.

4. To serve, add chopped green onion or other herbs for garnish.

PS I’ve linked this post to Diana’s page for “Simple Lives Thursday“. (Diana of “My Humble Kitchen“)

Sesame Noodles w/Buckwheat Soba: Gluten-Free, Or Close to it

The following recipe uses whole-grain buckwheat noodles that have a great texture (not too heavy, as some whole grain pastas can be). Eden makes a 100% buckwheat soba noodle, which would even be gluten-free (some other brands include wheat flour as well). The sesame seeds can be white or brown (unhusked are healthier than white though); the black ones are nice for a change too.

The recipe will be higher in salt content if you use the prescribed amount of soy sauce. If salt’s a problem, just use less. It will still be quite flavorful.

With its Asian flavors, this pasta goes well with Ginger Chicken, or a Spinach Salad with sweet n’ sour dressing. Serve cold or at room temperature. Double or triple this recipe for a large group–it’s a great party food. Serves 3-4.

Grateful-Table-Sesame-NoodlesINGREDIENTS

  • 8 oz. buckwheat noodles (“Soba Noodles”, in Asian section of the grocery store)
  • 1/4 c. sesame seeds
  • 1 small red pepper, diced fine
  • 1/3 c. soy sauce
  • 1/4 c. white vinegar
  • 1/4 tsp. cayenne
  • 1/4 c. toasted sesame oil
  • Optional: 2 TBS. fine-diced green onion
  • 1/4 c. honey

 PREPARATION

1. Cook, then drain, rinsing in cold water to cool: > 8 oz. buckwheat noodles

2. Toast, then set aside: > 1/4 c. sesame seeds

3. Grill in iron pan, in a touch of olive oil; then set aside: > 1 small red pepper, diced fine

4. Reduce liquid to approx. 1/4 c., boiling in saucepan until it’s half-evaporated: > 1/3 c. soy sauce > 1/4 c. white vinegar

5. To the reduced mix, add and mix in: > 1/4 tsp. cayenne

6. To cooked noodles, add, mixing well: > 1/4 c. toasted sesame oil > Optional: 2 TBS. fine-diced green onion

7. Once oil’s been mixed into noodles, add: > 1/4 c. honey > the toasted sesame seeds > grilled red peppers

8. Finally, toss back into pan of reduced soy sauce/vinegar, to coat noodles.

Kefir: Non-dairy Water Kefir- Easy, Simple Directions

My absolute favorite “soda” recipe for water kefir is this Orange Kefir Recipe. Though I’ve tried all kinds of flavors/juices/etc., the orange kefir recipe is the most successful for extra fizz and deliciousness. Oh, plus there are extra nutrients in orange rind, so… yeah!

Update, April, 2024: My kefir’s been going strong for almost ten years now! At one point, I had given some to a friend, and she had to give me some of hers when mine died. I hadn’t realized my Berkey filter needed replacing (the resulting chlorine killed mine off that time). Pure, filtered water can make all the difference for delicate probiotic critters.

Also, partway into this kefir venture, I discovered another helpful tip: Add an 1/8 tsp. baking soda every other time, and your grains will be extra happy.

I found they also get depressed when I’ve fed them regular “Grandma’s Molasses”, as it’s not organic, and doesn’t contain nearly as many nutrients as organic blackstrap. My grains had started getting tinier and tinier; when I switched back to the organic, they resumed their bouncy, fluffy-big demeanor. I think this says something to us about how nutrient-dense foods can really impact our health for the good as well.

Grateful-Table-Probiotic-BrewGet some grains from a friend, or buy some water kefir grains from Amazon. Just don’t use milk-kefir grains. These are NOT the same thing!

Spring water is best- chlorine will slow down (or kill) your grains. Also, don’t use honey. It is anti-bacterial, so it can slow the culture down (or stop it dead in its tracks).

I tried organic raw sugar, but after a month of that, my grains died. Coincidence? Not sure, but now I like to use a blend of half refined white sugar and half palm sugar (100% palm sugar seemed to turn out weird).

Oh, and never add fresh pineapple to the first ferment; one woman posted that her grains got irreparably damaged. Maybe it’s the extra enzymes in the pineapple? I’m not going to use pineapple.

Making water kefir is a fairly easy process, with just a little daily maintenance. After the kefir grains convert their food supply to probiotics (within a day or two), add them to a fresh jar of sugar/molasses water. You can tell by tasting the brew after the first 24-48 hours- if still sweet, you can let it ferment for another day or two, before bottling it for the second ferment.

Kefir Management (Buying Yourself Some Time)

Give yourself (and the grains) a vacation- the grains appreciate a little bath now and then anyway. Just drain off the sugar/water into a bottle, and add the grains back into their fermenting jar; cover with filtered water (unsweetened). Store these water-bath kefir grains in the fridge for a week or two, to the benefit of all.

Another trick: When getting bogged down with extra kefir, throw out all but two tablespoons of the grains. It takes longer for fewer grains to eat through the sugar water. (The more grains you have, the more quickly they eat through a new batch of sugar water.)

A friend tried refrigerating her grains in a strong sugar syrup so she could (hopefully) ignore them for months. The grains gradually multiplied to practically fill the whole jar. But they ate through every last bit o’ sugar/molasses that the water contained. And then… they died. They looked all right, but they had essentially gotten preserved in that jar like pickled brains or something. Looking prolific, but… dead!

The grains multiply; put the extras in the compost pile, or give to a friend (or even eat them?), or just throw ’em out. More will be created! Note: I discovered that our son’s dogs LOVE kefir grains, so they’re the clean-up crew for any extra grains when they’re around.

INGREDIENTS

  • 1/4 c. sugar (not raw, but refined white sugar, or half white/half palm sugar)
  • 2 tsp. molasses (organic blackstrap makes the grains so happy)
  • 1 slice lemon (optional)
  • 4 c. Spring water (filtered, non-chlorinated)
  • Kefir grains (1/4 to 1/2 c., more or less)

PREPARATION

1. Fill a quart jar with: > 1/4 c. white sugar > 2 tsp. molasses > 1 slice lemon (Optional) > 3-4 c. spring water (leaving space at the top for adding the grains)

2. Add lid and shake jar vigorously until sugar and molasses are mixed in.

3. Add rinsed kefir grains, cover with a lid.

4. Let mixture brew for 1-3 days, until not-so-sweet, but fermented.

5. For a second ferment, where carbonation will build up, making it like soda, drain brew into bottles with ceramic stoppers. See below for “Preparation for 2nd Ferment”.

6. Add the strained-out grains to fresh jar of sugar/molasses water, repeat steps. (As grains multiply, discard some as necessary, or give to friends.)

INGREDIENTS FOR 2ND FERMENT

  • Handful of dried fruit (raisins or other), or fresh fruits or juices
  • Other spices if desired (fresh sliced ginger, organic orange peel, vanilla, tamarind, etc.)
  • Optional: Favorite fruit juices or concentrates (fresh-juiced make the ferment go bonkers- super bubbly!)

PREPARATION FOR 2ND FERMENT

1. Into a clean 32-oz. bottle (or jar), decant the brewed kefir water, straining out the kefir grains, leaving space for other ingredients.

2. Add a small handful of favorite dried fruits (or experiment with fresh fruits), or use a cup or so of juice.

3. Optional: Add other flavorings if desired ( fresh ginger, organic orange peel, etc.),

4. Optional: If you add non-sweet flavorings like ginger, vanilla, or orange peel, you can actually add honey (or sugar) to this mix to give the kefir something to feed on, to make the brew extra tasty and extra fizzy. Although I don’t add honey to the kefir grains in the first ferment, it seems to work in the second ferment. Use organic honey if possible!

4. Let ferment another day or two, with lid or cap on. Check the bottle after a day or so (if you have the Grolsch-type bottle with resealable cap), to see if it’s fizzy enough. Refrigerate after about one or two days. Will keep for a couple weeks, refrigerated. Remove lid with care (over the sink, with hand over it, as it may become quite bubbly)!

5. Certain glass bottles can be reused (if they’re the kind you use a bottle-opener on); just get this to hold in the fizz. Or buy something like Grolsch beer, with its ceramic/rubber seal stopper, and reuse that. My fave are these Cobalt Blue 32 oz. Bottles; they’re sturdy, and are “family-size”, which is nice! (Some note that the blue glass protects against fluorescent rays also, which may/may not be an issue…)

I’ve linked this post to Kelly the Kitchen Kop’s “Real Food Wednesdays”; check out the other great links she’s listed, HERE!

I’ve also linked this post to My Humble Kitchen. Check out Diana’s page, “Simple Lives Thursday“, for more great ideas.

PS You might want to print up this simplified copy of the directions, below.

Grateful-Table-Directions-Kefir-Water-Probiotics

Caramel Sauce- Easy Dessert (Just Sugar, Cream, & Ice Cream)

With some ice-cream, sugar, and cream on hand, one can pull together an awesome dessert in no time! This is one of those quick and easy recipes; a perfect dessert choice for special occasions when time runs out. For a larger amount, increase quantities and use a larger pan.

For a variation, substitute butter for the cream, adding a touch of salt, and some water too, if necessary, to thin it out. Butterscotch!

Serves 4 or so.

Grateful-Table-Caramel-Sauce

INGREDIENTS

  • 1/2 c. sugar
  • Approx. 1/4 c. cream

PREPARATION

1. To caramelize sugar, get med.-small heavy skillet smoking hot. Turn pan off and sprinkle sugar in (enough sugar for a layer to cover the bottom of the pan): > 1/2 c. sugar

2. Tilt the pan to let unmelted sugar fall into “hot spots”. Turn pan back on if necessary, until sugar becomes a golden brown syrup

3. Remove pan from burner and very slowly add cream, stirring a bit in to incorporate it before adding the rest: > Approx. 1/4 c. cream, heated

3. Pour into a creamer or pitcher, dish up the ice cream, and enjoy!

Chicken Salad w/Caramelized Walnuts (A New Deli Classic)

If you’re cooking for a crowd, multiply this recipe. It’s definitely a crowd pleaser; we serve it regularly at The New Deli.

Part of the secret to using raisins: they get soaked overnight in red wine vinegar. It gives them the perfect sweet/sour flavor, plus, it keeps the raisins from soaking up mayonnaise (which doesn’t look as appetizing!).

Serves 8 (or more, for appetizers).

Grateful-Table-Chicken-Salad-w-Walnuts-Raisins-New-Deli

INGREDIENTS

  • 1/2 c. raisins
  • 1 1/2 TBS. red wine vinegar
  • 1/3 c. white sugar
  • 1 1/2 to 2 c. walnuts
  • 1 1/2 lb. raw, boneless, skinless chicken breast (or use 2 c. leftover chicken)
  • 1 c. mayo
  • 1/2 tsp. salt
  • 1/4 tsp. pepper

 PREPARATION

1. A day before, soak together: > 1/2 c. raisins > 1 1/2 TBS. red wine vinegar

2. Also ahead of time, caramelize walnuts. For smaller amounts, as in this recipe, use a medium-small skillet; for best results, use a heavy skillet, such as iron. Preheat until quite hot, even smoking. Turn heat off, turning back on as needed to finish “melting” the sugar. Sprinkle the sugar in the hot pan across the whole surface, and let melt on its own, without stirring. Tilt the pan to encourage the melting process; the melted parts will help dissolve any remaining white parts. Use: > 1/3 c. white sugar

3. To pan of caramelized sugar, which should soon appear translucent and golden, add: > 1 1/2 to 2 c. walnuts

4. Pour walnuts into the heated pan, stirring until mixed well with caramelized sugar. Turn into large bowl to cool.

5. For the chicken, bake some boneless, skinless chicken breasts at 375 degrees for one hour (or use already-cooked chicken): > 1 1/2 lb. raw, boneless, skinless chicken breast (or 2 c. leftover chicken)

6. Chop (or process) the cooked chicken, add to a big bowl. Also chop: > The cooled, caramelized walnuts

7. Mix all ingredients together in the bowl: > 2 c. fine-chopped celery > 1 c. mayo > 1/2 tsp. salt > 1/4 tsp. pepper > Soaked raisin/vinegar mix > Caramelized walnuts > Chopped chicken

8. Mix all the above together. To serve for lunch or a light dinner, scoop onto lettuce leaves or make into sandwiches. For appetizers, put onto thin-sliced sweet baguettes.

Cauliflower Soup w/Garbanzos, Coriander & Pine Nut Garnish

The garbanzo beans add protein, plus a sort of buttery richness. Also, after roasting the cauliflower (to develop flavor), “steeping” it in some hot water creates a creamier texture and flavors the broth. Chicken stock and other seasonings aren’t necessary, although one might play with the ingredients according to what’s on hand.

On the nutritional front, cauliflower’s a “white veggie”, full of special nutrients (see more about that on this page). The recipe is adapted from Yelena Strokin’s (using different methods).

Bowl of soup: Garbanzo beans, coriander seeds, cauliflowerThe sum can be greater than the parts: the buttery creaminess of the garbanzo beans complements the cauliflower, and the toasted, ground coriander seeds season it perfectly. Roasting the cauliflower first also enhances its flavor. Make this big batch and freeze some for later. Serves 6 or so, depending on size of cauliflower.

INGREDIENTS

  • 1 c. dry garbanzo beans (3 c. or so, cooked)
  • 1 head cauliflower
  • 1/3 c. virgin olive oil
  • 1 1/2 tsp. salt
  • 1 TBS. toasted coriander seed
  • Pine nuts and green onions (or chives) for garnish

PREPARATION

Cook until tender: > 1 c. garbanzo beans (or use 1-2 cans cooked beans, drained)

Set aside the cooked beans when done. Meanwhile, halve the cauliflower head, wrapping loosely in heavy-duty foil. Bake at 375 degrees for 1 hour, using: > 1 head cauliflower

Set roasted cauliflower in a large pressure cooker (or pot). Add boiling water just to cover; bring up to pressure, cooking again for 10 minutes or so. The cauliflower will soften in texture this way and make for a smoother soup.

Meanwhile, toast the coriander seeds for 2-3 minutes in a toaster oven or under broiler (or in a dry, hot pan, stirring constantly): > 1 TBS. coriander seed

Process the coriander seed in a small electric coffee grinder (or a blender, or with a mortar and pestle). Set aside.

Next, strain off and reserve the cooking broth. The core and outer leaves of the cauliflower will pull away easily; discard these. Process the cauliflower tops with the cooked garbanzos. To the processed beans and cauliflower, add: > 1/3 c. virgin olive oil > 1 1/2 tsp. salt > 1 TBS. toasted coriander seed

Add cooking broth back in and reheat, serving with chives or parsley as a garnish. You can also top with extra cauliflower, grilled until tender, and perhaps a sprinkling of pine nuts (toasted or raw).

Red Velvet Cake: Classic Frosting Recipe Too, Easy Style

This is a beautiful cake for special occasions. If using liquid red food coloring, it takes two small bottles, but one can use just a teaspoon of gel paste food coloring to get the same effect.

This is a classic Red Velvet Cake recipe, using the traditional cooked butter cream frosting, but with a shortcut, using microwave. Serves 8 or so.

Grateful-Table-Red-Velvet-CakeCAKE INGREDIENTS

  • 2 1/4 c. all-purpose flour
  • 1 1/2 c. sugar
  • 1 tsp. baking soda
  • 1 tsp. fine salt
  • 2 TBS. cocoa powder
  • 1 1/3 c. olive oil
  • 1 c. buttermilk, at room temperature
  • 2 large eggs, room temperature
  • 1/4 c. red food coloring (2 ounces), OR 1 tsp. red gel paste (found at craft or baking shops)
  • 1 tsp. white distilled vinegar
  • 1 tsp. vanilla extract

FROSTING INGREDIENTS

  • 3 TBS. flour
  • 1 c. milk
  • 1 c. sugar
  • 1 tsp. vanilla
  • 1 c. butter, room temperature

 CAKE PREPARATION

1. For cake, preheat the oven to 350 degrees. Oil and flour three 9″ round cake pans.

2. In a large bowl, mix the following well (breaking up any clumps of cocoa powder), then set aside on wax paper: > 2 1/4 c. flour > 1 1/2 c. sugar > 1 tsp. baking soda > 1 tsp. salt > 2 TBS. cocoa powder

3. In another large bowl, mix together: > 1 1/3 c. olive oil > 1 c. buttermilk > 2 eggs > 1/4 c. food coloring, OR 1 tsp. red gel paste (found at craft or baking shops) > 1 tsp. vinegar > 1 tsp. vanilla.

4. With mixer on low, slowly pour the wax paper-full of dry ingredients into the wet ingredients until just combined and smooth.

5. Pour cake batter into the prepared cake pans. Bake until the cake pulls away from the side of the pans, and a toothpick inserted in the center of the cakes comes out clean, about 30 minutes.

6. Run a knife around the edges of cakes to loosen them, and invert the cakes onto a plate, re-inverting them onto a cooling rack, with rounded-sides up. Let cool completely.


FROSTING PREPARATION

1. Make roux using small saucepan on the stove, or use the following microwave method: Choose a larger, microwaveable bowl (quart-size or larger) to mix flour and sugar in, as mixture might bubble up some- this will reduce chances of spills in the microwave. To the large, microwaveable bowl, mix together: > 1 c. sugar > 3 TBS. flour

2. In separate, smaller bowl, microwave 1 minute or so, until hot: > 1 c. milk

3. Add hot milk to flour/sugar mix slowly, to avoid lumps. Microwave 2 minute more, stir. Return to microwave for 30 more seconds, if necessary, until mixture’s bubbly hot. (Watch to make sure it doesn’t bubble over.) Add to hot milk/flour/sugar mix: > 1 tsp. vanilla

4. Cover bowl with plastic; cool completely in refrigerator.

5. To a standing mixer, add: > The sugar/flour/milk mix > 1 c. butter, room temperature

6. Cream until light, on high speed, until very fluffy. Split cakes to make four layers; frost the layers and outside of cake.