I’d been making this sourdough whole wheat bread for some time, if only for the health benefits. The sourdough process helps reduce phytic acid (a plus), and makes for a lower-glycemic bread. Also, some of the gluten gets broken down in the long, slow fermenting process. And it has more naturally-occuring B vitamins too, thanks to the wild yeast at work. (The blog Cheeseslave goes into more detail here.)
But my bread didn’t have the greatest texture. I needed to figure out how to make artisan bread. Which wasn’t easy. I kept saying, “Artesian”, like the well… My daughter-in-law said, maybe that’s why it wasn’t turning out. I needed to clarify. Artisan, not Artesian… Ha.
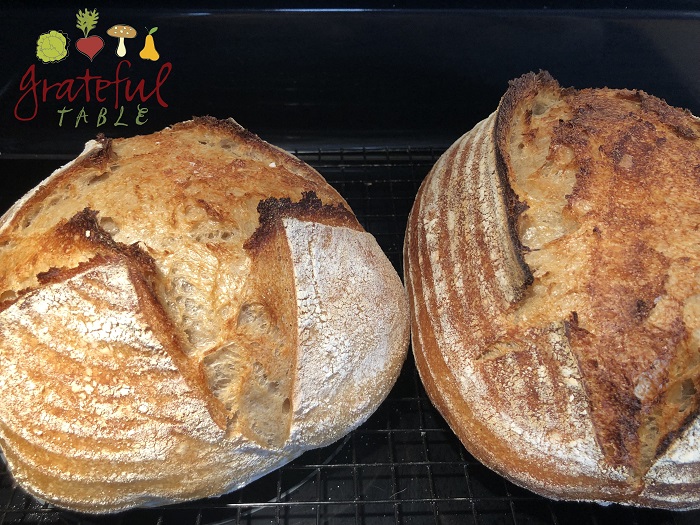
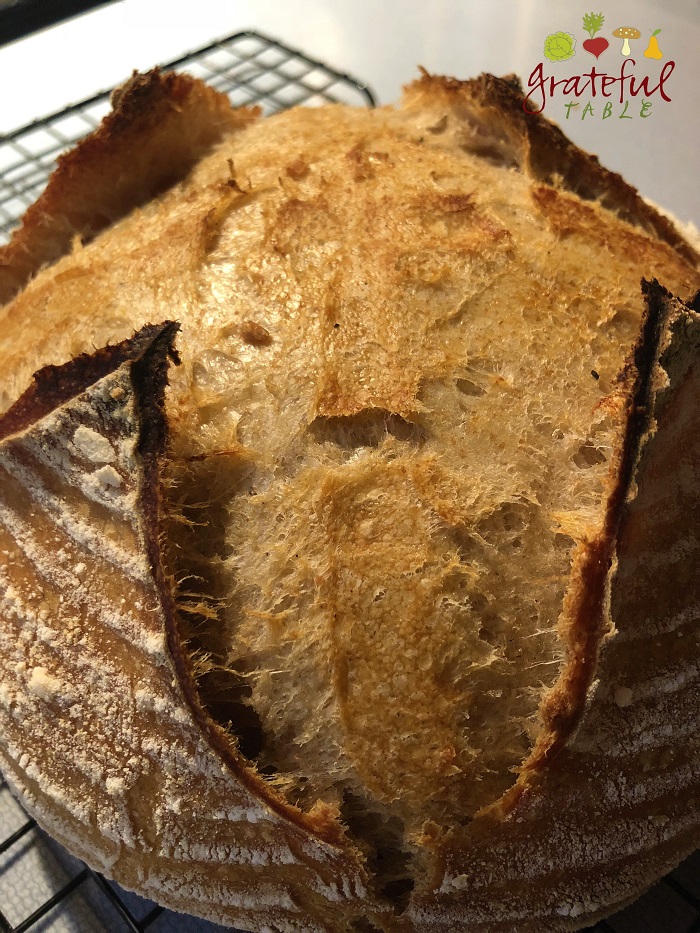
I finally had success. This new bread had layers of complex flavors, with a great crust, and open crumb- almost custardy inside. Yum.
 It starts with a lively starter (details on that starter here.). I usually feed my baby starter twice a day (removing half of it each time). The extra feedings make for a pretty rambunctious starter. It builds its character. The flavors get more complex, texture more interesting, yada yada. The way I used to do it still works, for busier times when I can’t mess with bi-daily feedings. (With that old method, I feed a refrigerated starter every 3-7 days, which is enough to keep it pretty lively.)
I didn’t like the idea of removing some of that starter, adding it to a discard pile in the fridge. But I’ve changed the name of the discard pile to “Future Cracker Dough”. I don’t feel as bad now. (Or it can become pancakes or waffles with the addition of an egg or two.) Another new discovery: I can add the starter discard to my next batch of dough, as long as it’s not too big a quantity, without affecting the flavor adversely. (Excess starter can also be frozen, for two months or so.)
In the old days, I accumulated large starter quantities, as I would feed the thing every few days, never taking any out. And I only made bread with it once a week or so. The bread turned out well enough using the large quantity of starter, but not quite as exciting as I’d hoped. With this new method, I feed a small quantity of very active starter, using part of it to begin feeding at a warmer temperature, until I’ve got the amount I want for however much bread I’m making. I refrigerate the rest of the newly-fed starter. It seems fine to let it hang out in the fridge for up to a week, at which point I bring it out again, for a fresh feeding when I begin another bread-making project.
 Below is my latest fave bread recipe, “Sourdough Artisan Bread”.
Makes 2 loaves- about 2 1/2 lb. each
INGREDIENTS
- About 1/4 c. stiff sourdough starter*
- 2/3 c warm water
- 1 1/3 c. whole wheat/rye flour (or half malted flour)
- Approx. 6 c. malted flour (1.67lb.)**
- Approx. 3 1/2 c. water, divided
- 1 TBS. salt***
- Rice flour (or white or corn flour)
In a smaller bowl, mix together: > about 1/4 c. starter (un-refreshed) > 1/3 c. warm water > 1 1/3 c. whole grain flour (optional: use half malted or all-purpose flour)
Let this mixture rest in a warm place for 4-5 hours (an oven with the light on works for a cool kitchen).
About an hour before time’s-up for that starter, add most of the remaining water to the malted flour in a larger bowl, mixing with hands or a spatula until flour’s distributed. Adding water to flour starts an enzyme process whereby the starches begin converting to sugars, etc. This leads to more flavor! (Called an “autolyse”, in scientific terms). Use: > 6 c. malted flour (or all-purpose) > 3 1/4 c. warm water
Cover this mixture and let it rest one hour or so in that warm place (next to the bowl of starter mix).
After the big bowl of flour/water mix has rested an hour or so, and the starter (“levain”) has gone four or five hours (and has maybe caved in a bit), mix the two together, breaking up the stiff starter so it’ll mix in better.
‘”Stretch and fold” the dough, as in, pull a chunk of the dough from the edge, into the center. And repeat. Let the dough stretch as much as it will, without breaking. Fold about ten times. It will start to seem smoother and not too sticky. It won’t have to be thoroughly mixed at this point, as there’s more folding to come.
Before leaving it to rest, use fingers and poke a few holes in the dough, adding a mixture of salt and water on top. Don’t mix it in yet; just pour it over the dough. Use a mixture of: > 1/4 c. warm water > 1 TBS. salt
Let the dough rest 20 minutes or so. The main thing is to leave it be for a bit, to do its own thing. At this point, gluten molecules are aligning themselves and doing the work of kneading, all on their own. All they need is time. To themselves. We can’t rush this process by man-handling the dough!
After 20 or so minutes of resting, fold the dough again, about four times, until the dough gains “strength”. It should feel elastic and smooth. Less handling is usually better.
Let the dough rest for 30 minutes. Every 30 minutes, for the next hour or two, stretch and fold the dough a bit. The dough should bundle up and pull easily from the sides, indicating that it’s ready to be left alone to finish fermenting.
This is now the “bulk-ferment” phase. Leave this folded dough alone now for a few more hours, then “cut” the dough in half (for forming two loaves); a hard plastic spatula works well for this. Gently form each ball into a round, pulling from the outside to the middle to shape it. I do this step on a dampened counter, as the dough doesn’t stick much this way. It also keeps me from adding more flour, which seems to be a plus flavor-wise. Let the pre-shaped loaves rest another 20 minutes, covered with bowls.
After resting a bit (again with the resting!), shape once more, into preferred shape. Set into a lightly-dusted, cloth-lined basket or bowl, with the dough bottom side up. (I like this bread-proofing basket.) Flour the loaves fairly heavily, to keep them from sticking to the basket. Cover with oiled plastic wrap or wax wrap, and let rest another hour or two.
Note: the dough is usually pretty wet. It can seem difficult to call it to attention for the final shaping. And yet, even the wettest dough can make a good loaf.
Finally (almost done), after the dough has proofed at room-temp for an hour or two, place the covered, shaped dough in the fridge overnight (or up to 24 hours, although 18 hours is probably ideal). This slows down fermentation, which insures more flavor.
Preheat oven, and a Dutch oven and/or a baking stone, to 500 degrees (this usually takes 40 minutes or so). Gently invert refrigerated dough onto parchment paper; score top. Serrated knife, box-cutter, and “bread-scoring lame” all work ( this “bread-scoring lame” is my fave). Lift the parchment and bread into a Dutch oven, covering it for the first 20 minutes. (Or make some other configuration, to create a steamy environment for baking, like a baking stone with a pot/pan on top of it.) (Or bake the bread on a baking stone with a tray filled with hot water on a shelf below it.)
Reduce heat to 450 degrees and bake the bread covered for 20 minutes. Remove cover, lower heat to 400 degrees, and bake 20 more minutes, or to desired doneness
*This stiff starter gets fed about twice daily. For each feeding, remove some old starter, leaving a tablespoon or so in jar. Add about 2 tsp. water, and 1 Tablespoon whole-grain flour. (A mix of wheat and rye flour is great)
**AKA Organic Artisan Bakers Craft Flour (malted) is primo, although all-purpose, unbleached flour can substitute. I’ve bought my craft flour here, at about $1.14/lb., including shipping. But I recently discovered some great Central Milling Co. flour at Costco, that’s perfect for bread. It might be the same product- it’s an organic, unbleached flour from hard red wheat, with some malted barley mixed in. It’s delicious!
***Use about 1 tsp. salt per pound of dough
One Response to “Sourdough Bread, Artisan Style”