Latest Recipes

An Index to What’s In “Soup’s On!”

Author Jennifer Cote
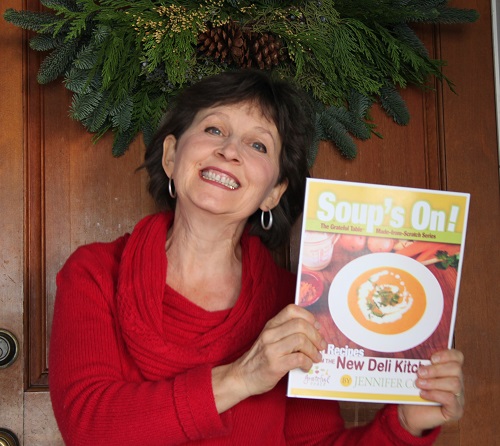
Below is an index to what’s found in my ebook, “Soup’s On, Made From Scratch”. These recipes can be found here at the website too, but if you want everything in one handy book, then order a copy! You can view ebooks on your computer, phone, Kindle, or tablet… pretty handy 🙂

Artichoke Garden Soup: Easiest soup ever?! I use Trader Joe’s frozen artichokes- they have a better texture than canned ones. (You can use fresh ones, if you have the time…) From there, you just add some steamed zucchini, some garlic, whirl it up in the blender with some chicken stock or cream.

Asparagus Soup with Tarragon and Goat Cheese: Cook up some asparagus (saving tips for garnish). A simple roux pulls this soup together.

Barley Mushroom Soup: A whole-grain, simple recipe; the tomato, rosemary, and garlic blend perfectly.

Black Bean Chili: A hearty vegetarian soup; a protein-rich, flavorful, simple recipe. It’s an extra thick mix (that you add water to to serve), so it freezes real well into portioned “blobs”. Makes such an easy last-minute dinner!

Borscht: A great way to use beets, in a healthy version of a Russian classic. Containing potatoes, carrot, and cabbage too, and some toasted caraway seed for authentic flavor.

Broccoli Potato Soup: An extra healthy soup recipe. Potatoes thicken it, so it doesn’t need flour (yay, gluten-free!). The broccoli is cooked in water; use that broth to cook the potatoes. Then, the broccoli gets processed (with immersion blender or food processor); the potatoes get processed in next. They don’t go in at the same time, since a little over-processing will turn those potatoes to glue!

Butternut Squash Soup: Using a simple method of cooking squash; pureed with apple juice and a simple spice mix for a quick, delicious, creamy soup, that’s still healthy!

Carrot Soup w/Dill: A gluten-free recipe flavored with caraway seed. A bit of cooked red quinoa adds the perfect garnish.

Carrot Soup, Curried: A gluten-free, flavorful soup using pureed carrot, potato, and coconut milk.

Cauliflower Soup: With garbanzo beans making it buttery, creamy. Roasting the cauliflower brings out its flavor, and toasted coriander seasons it perfectly.

Celery Leek Soup: With potatoes thickening this soup (no flour), it’s gluten-free. Celery seeds add a lot of celery flavor. Delicious!

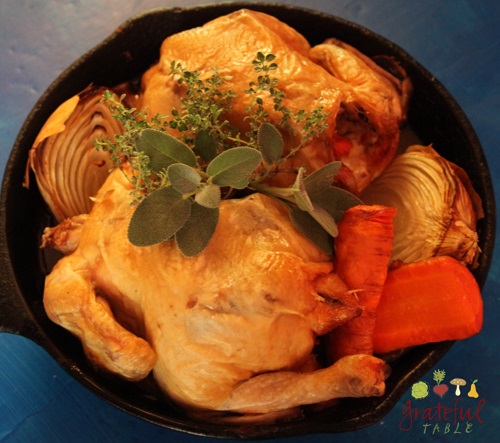
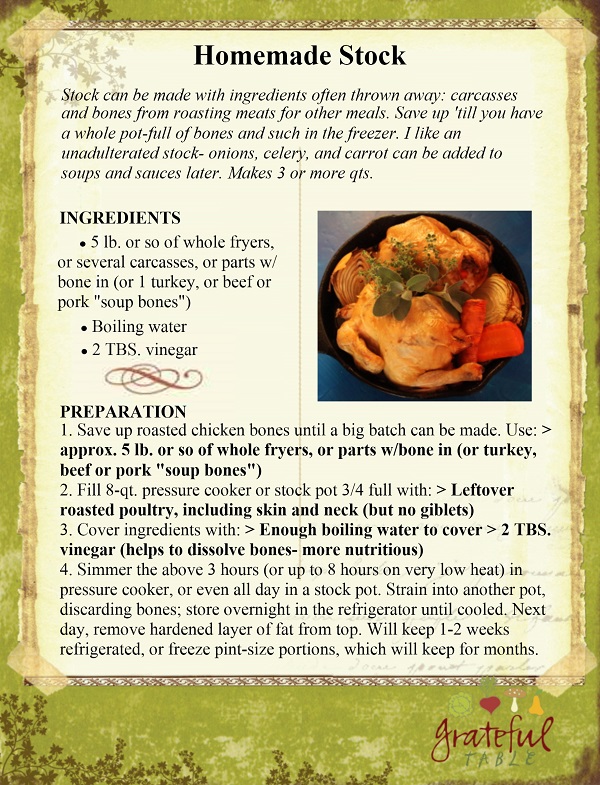
Chicken Stock: Simple, but good. You don’t really have to put anything else in the pot, except some chicken bones (yumm, “bone broth”!). When using the stock in soups, other veggies, herbs and spices can be added then.

Chili, Traditional Style: Cook your own kidney beans! Much better texture than canned, plus you save money. And it’s a smaller carbon foot-print, since it’s easier to ship dry beans to your home, than to ship them to a processing plant that cooks them, plumps them full of water, and eventually gets them to a store…

Chipotle Potato Soup: There’s an easy way to make a “Chipotle Drizzle” (using dried chipotles, virgin olive oil, and a little boiling water and salt). Other canned chipotle products have a lot of cheap ingredients, and just a little chipotle in ’em. Just get the dried peppers!

Cream of Chestnut Soup: This is a classy soup. It takes awhile to shuck chestnuts, but there is a method that makes it a little easier. A labor of love, but worth it.

Cream of Corn Soup w/Cashews and Cilantro: What an easy recipe. Cashews can get presoaked, but because they’re already a softer nut, they’ll blend up into a nice “cream”. Add frozen corn (thawed), cayenne, and some cilantro for garnish. This is a good gluten-free, vegan soup.

French Onion Soup: A classic recipe, using saved up, frozen meat drippings and stock for rich flavor, plus a unique “roux” using some red wine vinegar instead of the usual Vermouth. Tastes at least as good, and it’s more economical.

Golden Pepper Soup: It’s nice to take advantage of produce when it’s cheap and plentiful. to use at a later date in things like this soup. Roasting peppers is a way to preserve them, and it is really quite easy. At The New Deli, we used to do them under the broiler, but found that a piping hot iron pan was even easier. We add the peppers, put a lid on it (yes, we have an awesome, heavy iron lid, which I recommend). Then we turn them every six minutes or so until charred/blackish on all sides. From there, we can make stuff like this soup. Or save the roasted, peeled peppers in the freezer- they freeze perfectly.

Green Chili Cheese Soup: So easy- mostly just some potatoes, with some canned tomato pieces added. As mentioned in the above paragraph, green chilis are easy to roast at home (or “cheat” and use canned). A little toasted cumin seed and cilantro add extra flavor.

Lentil Soup: The New Deli’s “hippie-style” soup, from our vegetarian days. Lots of soups can be vegetarian, but of course the ones with legumes in them will offer more protein. A dash of liquid smoke and some chili powder make this a pretty exciting soup.

Mushroom Soup, Creamy Style: You can make this the traditional French way, by cooking down some pureed mushrooms until they are fairly dry. The French then even dehydrate them more, then grind them even finer. This is how a very hearty mushroom flavor is achieved without just having a pile o’ mushrooms in the bowl. My favorite way to make this soup now is to just buy some Porcini mushroom powder on Amazon, because… well, the other way is fairly labor intensive. The porcini powder is so worth it. And then, making this soup becomes a total breeze!

Potato Cheddar Soup: This soup is made with an economical (but good quality) cheddar, even though it tastes like it was made with a fancy smoked cheddar. How’s that? Just add a touch of liquid smoke- a perfect combination with the creamy potatoes…

Potato Swiss Soup: Using Swiss and blue cheese, plus Dijon mustard, nutmeg- a New Deli favorite

Red Lentil Soup: Popular for its quick-cooking, as well as its flavor; the sweet potatoes and curried spices add nutrition and an ethnic twist

Seafood Gumbo: Maybe part of the secret is in using shrimp with heads on (lil’ feelers and all). The heads made a great stock! This is a classic recipe, Cajun-style, made by heating and stirring the roux until dark and rich.

Split Pea Soup: a low-fat, vegetarian version of the classic.

Sweet Potato Autumn Veggie Soup: Cauliflower pairs up nicely with sweet potato, for a Paleo-style soup.

Thai Curried Rice Soup: It’s tricky for that Japanese eggplant to keep it’s color, but there’s a healthier way to do that, without deep-frying. Adding green curry paste makes it exciting, although regular ginger can sub for the “galangal”, and lemon zest might do in place of lemon grass. Still good!

Tomato Basil Soup, using a unique blend of lemon, orange, and bay leaf, mellowed out with the addition of cooked carrot

Tomato Soup with Dill: Creamy tomato soup with more seasoning; toasted fennel seed adds a nice touch.

Vegetable Rice Soup: Using a simple tomato paste/spice mix for a base (AKA “Thousand Island Mix“), just add veggies and rice, for a quick, easy soup.

White Bean Tomato Soup: Cook up some white beans from scratch- they don’t take much more than an hour. Add some canned tomato, some fresh rosemary and garlic. Oh, some kale goes nicely in this too!

Wild Rice Winter Squash Soup: Sometimes I need an excuse to cook up some wild rice- it’s so fragrant! For those with allergies, wild rice is of a completely different family than other grasses, so it’s usually a safe food in that respect. Good stuff.

Banana Bread, Circa New Deli 1985

“WAY-BACK WEDNESDAY”: We used to make this recipe thirty-some years ago, when “The New Deli” was just a small wholesale sandwich business operating out of our home kitchen. We enjoyed many an end piece of this bread (as did our then-toddler son); we wrapped up buttered slices to ship out to health food stores in the Bay Area, under the name “Foods for Thought”. We were just a couple of hippies at the time, with a little “grass-roots”, home-style food business.

Three years into that, we realized we should become legit. And so The New Deli was birthed!

Whole Wheat Banana Bread of New Deli FameWe used to grind our own whole wheat flour to make goodies like this for our fledgling food business, back in the eighties. I loved that we were giving people a fresh-ground flour, complete with nutrients (vitamin E, etc.), that hadn’t gone rancid sitting on some store shelf.

When the flour grinder finally busted, I learned that I could sub a good organic unbleached flour for the whole wheat flour. Using a small electric coffee/spice grinder, I could add fresh-ground flax seed, and we could still get those good essential oils in the mix. With a bit of bran added as well, it seemed we had the next-best-thing to fresh-ground flour!

This recipe was always popular, putting ripe bananas to good use. Ripe bananas can even store in the refrigerator for up to a week, until one is ready to make this recipe. Makes 2 8″ loaves.

INGREDIENTS

  • 1 3/4 c. walnuts
  • 1 c. brown sugar or palm sugar
  • Slightly rounded 2 TBS. molasses
  • 2 1/4 c. whole wheat flour (3/4 lb.)*
  • 1/2 tsp. salt
  • 1 tsp. baking soda
  • 1 1/2 c. mashed, ripe bananas (about 4-5 ripe bananas; over a lb. to start)
  • 2 eggs
  • Optional: 2 TBS. flax seed, ground into meal in small coffee/spice grinder

PREPARATION

1. Preheat oven to 350 degrees. Butter or oil 8″ bread pan.

2. Toast in oven 8-10 minutes until golden: > 1 3/4 c. walnuts

3. Into a mixer bowl, blend together: > 1 c. brown sugar > slightly rounded 2 TBS. molasses > 2 1/4 c. fresh-ground wheat flour > 1/2 tsp. salt > 1 tsp. baking soda > optional: 2 TBS. flax seed, ground into meal in small coffee/spice grinder

4. Set the above mix aside. In separate bowl, use a potato masher to “puree” the banana, or process lightly in blender until medium-smooth: > 1 1/2 c. mashed, ripe bananas (about 4-5 ripe bananas; over a pound to start)

5. Stir into the mashed banana: > 2 eggs

6. To the bowl of banana and egg, add and mix in gently (not over-mixing): > The sugar/flour mixture > The toasted walnuts

7. Pour batter into pan, bake at 350 degrees for 40-50 minutes, until toothpick in center comes out clean. Let rest 20 minutes or so before removing from pan and serving.

* Fresh-ground flour is preferred, as whole wheat flour will otherwise go rancid in less than a week. But use these amounts to sub for the 2 1/4 c. whole wheat flour, if necessary: > 1 2/3 c. all-purpose flour > 1/3 c. wheat bran > 2 TBS. flax seed, ground into meal in small coffee/spice grinder

Chocolate Strawberry Truffles, Healthy Style

Even my skeptical son enjoyed these. He and his cousin are highly suspect of my “healthy” treats, since they’re so unlike typical sweets. But he gave these a thumbs-up!

Showing Love with Healthy Truffles!These make a healthy treat for those of us not eating the usual desserts- a great chocolate fix with a healthy dose of coconut oil (to stimulate metabolism and nourish the brain and such). For those with a sweeter sweet tooth, a hearty sprinkling of palm sugar on top of the chocolate after dipping will help “sweeten the deal”.

At one point in my experiments, I tried using palm sugar in the blended strawberry mixture. Big mistake. There was some kind of reaction, and the mixture turned an unappetizing brown color. Don’t try that!

Makes about 12 half-ounce truffles; extras will hold up well in the freezer.

STRAWBERRY PUREE INGREDIENTS

  • 6 oz. frozen strawberries (half a 12-oz. bag, making about 2/3 c. puree)
  • 2 TBS. melted butter
  • 1/2 c. coconut “spread” (ie. “manna”, “butter”), melted
  • 1 TBS. honey

CHOCOLATE DIP INGREDIENTS (Enough for a double batch)

  • 1/4 c. butter
  • 1/4 c. coconut oil
  • 2 TBS. honey
  • 1/3 c. cocoa powder

PREPARATION

1. Let frozen strawberries thaw, then puree. Use: > 6 oz. frozen, thawed strawberries (or fresh)

2. To the strawberry puree, add: > 1/2 c. coconut “spread” (ie. “manna”, “butter”), melted > 1 TBS. honey

3. Let mixture firm up, then form into half-ounce-sized balls. Set aside on wax paper in freezer until solid.

4. Prepare “chocolate” for dipping. Gently melt coconut oil and butter in pan: > 1/4 c. butter > 1/4 c. coconut oil

5. Stir in: > 2 TBS. honey > 1/3 c. cocoa powder

6. Let chocolate mix sit out 20-40 minutes to thicken up some. Stir well, then dip strawberry balls into chocolate mixture. Sprinkle with palm sugar as you go (while chocolate’s still warm), if a sweeter truffle is desired. There will be left-over chocolate (enough to make another batch). We like this, as it makes a wonderful addition to our smoothies and such.

7. Store in refrigerator, or for several months in the freezer.

Use Frozen Strawberries, Coconut & Honey, For Healthy TrufflesPS. I’ve linked this to Kelly the Kitchen Kop’s Blog Carnival. Kelly hosts this thing regularly, where you can find all kinds of cook, healthy recipes and articles. Thanks, Kelly!

(Also posted on June’s Blog, Raising Homemakers.)


Portabella Mushroom Burgers- Vegetarian Style

Use the mushrooms in place of hamburger patties, for a “meaty” vegetarian alternative at dinner. Or let the mushrooms cool off a bit, slicing into strips. Toss a simple salad of greens, olive oil, vinegar, and salt (or your favorite dressing), dish up onto salad plates, topping with the mushroom strips. What a salad!

 Vegetarian Main Dish: Portabella!INGREDIENTS

  • 4 Portabella Mushrooms
  • 1/2 c. or so olive oil
  • 1 TBS. chopped fresh garlic
  • 1/2 lb. mozzarella, provolone, or Jack cheese, sliced
  • 1/3 c. Parmesan cheese, grated

PREPARATION

1. Get enough Portabella mushrooms for the number of people you’re serving. Typically, it’s one burger-sized mushroom per person, or just a half mushroom per person for a salad. Remove stem and drizzle olive oil on the inside; rub more olive oil onto the outside. For four burgers, use: > 4 Portabella Mushrooms > about 1/2 c. or so olive oil

2. Next, spread some chopped garlic around the inside of the mushroom. Use: > 1 TBS. chopped fresh garlic

3. Add: > 1/2 lb. mozzarella, provolone, or Jack cheese, sliced (or grated)

4. Top with: > 1/3 c. Parmesan cheese, grated

5. Bake the cheese-mushrooms at 350 degrees for 30-40 minutes or so, until cheese is lightly golden. Serve on toasted hamburger buns, with all the fixings, if desired, or atop a salad.

6. If you’re short on time, you can speed things along using the microwave. Microwave the cheese-mushrooms (about 1-2 minutes per mushroom), then broil just a few minutes, until cheese is golden and mushrooms are soft.

Springerle- Easy Anise Cookie for Christmas

It’s great to involve kids in cookie-baking projects, but attention can wane. This particular recipe is perfect for those with a limited time/attention spans, of all ages! A special rolling pin is required, which will emboss a design on the cookie. But the dough is easy to make- just a few ingredients. Other recipes may contain extra ingredients, but this simple recipe seems to work perfectly.

Easiest Christmas Cookie: Springerle!

Although this festive cookie takes little effort, some waiting is involved. The dough refrigerates for several hours, and the cut-out cookies need to air dry on parchment for at least half a day before baking. This gives them their texture- perfect for dipping in tea and such. Makes about 4 ½ dozen cookies.

INGREDIENTS

  • 2 eggs
  • 1 c. sugar
  • 2 1/4 c. flour
  • 1 tsp. anise seed
  • Optional: 1/2 tsp. anise extract, if desired

PREPARATION

1. Cream: > 2 eggs > 1 c. sugar

2. Stir in, until very stiff: > 2 1/4 c. flour > 1 tsp. anise seed > 1/2 tsp. anise extract, if desired

3. Place on plastic wrap, patting out into a rectangle shape, for easier rolling later. Refrigerate 3-4 hours or more.

4. Roll or pat out on floured board, into a piece (or two) that are about the width of the rolling pin. Roll out with a “springerle cookie rolling pin”, pressing down firmly to emboss. Cut into squares, let dry at least 10 hours on parchment paper.

5. Before baking, use a spatula to lift the cookies from the parchment (so they stick less). Bake on the parchment at 325 degrees, 12-15 minutes. They shouldn’t brown, although the edges can get slightly golden. Let cool on racks; store for 1-2 weeks (these actually keep quite well).

Springerle cookie rolling pin embossed design on cookies

Gingerbread Cake w/ Lemon Curd (& No Leftover Egg Whites)

I had to post this recipe for the Christmas season- my aunt used to love this dessert, and it brings back such good memories… Another memory: several years back, we made huge batch of this (20 x recipe), to serve at our church’s annual Women’s Christmas Dinner. (Contact me if you need THAT recipe!)

Gingerbread w/Lemon Curd- no leftover egg whites!I don’t typically want to save egg whites in the freezer- I just want a recipe that uses the whole egg! So I came up with this recipe, which uses the egg whites leftover from making Lemon Curd, in the cake. Heating the butter and lemon juice for the lemon curd before it adding to the egg yolks, speeds the process along. Serves 9 or so.

INGREDIENTS

  • 2 1/3 c. flour
  • 1/3 c. sugar
  • 1 tsp. baking soda
  • 1 tsp. cinnamon
  • 3/4 tsp. salt
  • 2-4″ piece ginger (or substitute 2 tsp. dry ginger)
  • 1 c. (2 sticks) room temperature butter, divided
  • 1/2 c. olive oil
  • 5 eggs, separated
  • 1 1/2 c. light molasses
  • 1 cup sugar
  • 4 lemons, zested and juiced (1/3 c. total)
  • 1/4 lb. (1 stick) butter

PREPARATION

1. Mix dry ingredients together first: > 2 1/3 c. flour > 1/3 c. sugar > 1 tsp. baking soda > 1 tsp. cinnamon > 3/4 tsp. salt

2. Grate: > 2-4″ piece ginger (or substitute 2 tsp. dry ginger)

3. Mix the dry ingredients and the following in mixer on low, then 3 minutes on medium: > 1/2 c. (1 stick) butter, soft > 1/2 c. olive oil > 5 egg whites > 1 1/2 c. molasses > the grated ginger

4. Oil and flour 9″ square pan (or 13 x 9″ pan, which will cook quicker). Bake 45-55 min. at 300 degrees. Cool; serve w/ lemon curd.


Lemon Curd

This will make about 1 pint, enough for the above cake.

PREPARATION

1. Mix together until smooth: > 5 egg yolks > 1 cup sugar

2. Microwave or heat in pot, 1-2 minutes, until melted and bubbly: > 1 stick butter > 1/3 c. lemon juice > zest from 4 lemons

3. Slowly mix hot butter/lemon into yolk mixture. Microwave 30 seconds, then stir and repeat until thickened, or- warm gently on the stove just until thickened. This can store 2 weeks or more, refrigerated.

Stock- Homemade & Easy!

Stock is so easy to make! Yes, it’s easier to buy a carton or can of it, but I think some of the nutrition and flavor is lost. A good batch of stock is full of gelatin, congealing after refrigerating, so you know it’s rich. With homemade stock, you can also use minimal salt. I always like to add salt just as I’m finishing preparing a dish. Otherwise, I believe too much sodium soaks into the ingredients. Not that it makes the finished product taste that salty. But it IS loaded with sodium! The salt added to dishes last is more pronounced, so you can use less.

Some folks might add carrot, celery, herbs, and/or onion to the pan when roasting their meats, to add to the stock. It will add more flavor, but I prefer an unadulterated stock: other extras can be added in later, when using the stock in various soups and sauces.

Chicken, Turkey, Beef, or Pork: Homemade Stock

Stock Recipe from "Soup's On" (Jen's Book)

Gingerbread Cookies, Natural Style

I’m pretty excited about ginger right now. It fights inflammation and can help regulate blood sugar, serum cholesterol, and cortisol levels. Not that I’m chowing down on Gingerbread cookies for health reasons (although I am making some ginger tea). But for the holidays, these cookies are a fun, special treat, even for some gift-giving!

Christmas Gingerbread Cookies, Decorated w/Nuts, Dried FruitsUsing fruits and nuts to decorate allows for creative input from cookie-bakers of all ages- easier and less messy than frosting! Makes approx. 15 cookies.

INGREDIENTS

  •  1 stick butter
  • 1/2 c. brown sugar, packed
  • 1/2 c. molasses
  • 1/4 c. water
  • 2 1/2 c. flour
  • 1/2 tsp. salt
  • 1/2 tsp. baking soda
  • 1 TBS. (or more) fresh grated ginger (or sub powdered ginger)
  • 1/2 tsp. nutmeg
  • 1/4 tsp. allspice
  • OPTIONAL: 1/4 tsp. cayenne pepper
  • Cashew pieces (for smiles)
  • Dates and sweetened dried pineapple (for hair)
  • Pecans, almonds, and chocolate chips (for misc.)

PREPARATION

1. Cream in mixer, several minutes on high: > 1 stick butter > 1/2 c. brown sugar, packed

2. Add the following, beating just until blended: > 1/2 c. molasses > 1/4 c. water > 2 1/2 c. flour > 1/2 tsp. salt > 1/2 tsp. baking soda > 1 TBS. (or more) fresh grated ginger > 1/2 tsp. nutmeg > 1/4 tsp. allspice

3. Refrigerate dough several hours, or longer. (Dough will keep in refrigerator for several weeks, wrapped in plastic.) Roll dough out to 1/4″ thickness (easily accomplished rolling it between 2 pieces of plastic wrap, floured some as needed). Cut into gingerbread people.

4. Decorate cookies before baking, using the following, or your own creations: > Cashew pieces (for smiles) > Dates & sweetened dried pineapple (for hair) > Pecans, almonds, and chocolate chips (for misc.)

5. Bake cookies at 375 degrees for 10 to 12 minutes.

Homemade Gifts: Natural Skin Care Goodies

Part of my enthusiasm for making my own skin care products is my love of essential oils, which I use regularly in face creams and bath salts for myself. Certain ones are perfect for skin, for mood; some have hormone-balancing and other benefits. I’ve shared my favorites at “Jen’s Shop“; if you’re interested in aromatherapy, take a look at the oils I suggest there (under the “Health, Beauty, & Lifestyle” section). I mention the qualities each is known for; also, I’ve chosen oils that are more therapeutic. Some “essential oils” may be a blend of an expensive variety (like, of lavender), but mixed with a carrier oil or even a sub-par plant variety. But I’ve picked out the best quality and value for you, at Jen’s Shop!

Oh, for another fun, homemade gift (that you can make with your kids), check out my “Cinnamon Ornament” post!

Homemade Gifts: Natural Skin CareWe had a lot of fun at a recent “Spa-rific” New Deli party, where we made up various creams, balms, and such to give as gifts. We made body butter, bath salts, lip balm… all using natural, top-quality ingredients. We didn’t have to bear with any shopping crowds- got all this stuff online! Below are some favorite recipes.

Homemade Body ButterBODY BUTTER

INGREDIENTS

PREPARATION*

1. Warm the 1/2 c. coconut oil in a 2-cup glass measuring cup. Use a warm oven, or a double-boiler (with a folded towel set in bottom of pot to protect the glass cup).

2. Add cocoa butter pieces to the melted coconut oil, until it measures another half cup (that will be one cup total).

3. Warm this mix some more, until mixture’s melted. Add in the 1/2 c. shea butter using the same “displacement method”.

4. Let warm again, enough to blend the mixture, then mix in about 20-30 drops of favorite essential oils. (Lavender’s a nice one.)

5. Refrigerate the mix enough for it to set some, then whip it, then fill glass jars with it (these 4oz Amber Glass Jars are cute). Label cutely and you’ve got some nice gifts on your hands!

*General Tip: Three or four parts hard butters to one part oils works well. If you have a scale, you can measure equal parts of the four fats and oils, melting them gently in a small saucepan.


Homemade Bath SaltsBATH SALTS

  • 3 c. Epsom Salts
  • 2 c. Baking Soda
  • 1 c. Sea Salt
  • 8 drops or so  Lavender essential oil (or other)
  • 1 TBS. Vitamin C powder

Just mix and store in cute mason jars. My husband says most people aren’t as into Epsom salts as I am, but if you’re concerned about chlorine, this recipe helps address that issue. (Read my article, “Turning Chlorinated Water into Liquid Gold“, for more info on the subject.)


Homemade Face ScrubEASY FACE SCRUB

  • 1 c. brown sugar
  • 1/3 c. olive oil
  • 2 TBS. fine sea salt
  • 4 or more drops favorite essential oil ( Lavender, lemongrass, linden blossom, etc.)

Mix, then put up in 4oz.-size jars (like these) – a good size for most of us. I don’t recommend white sugar–it doesn’t mix well with the oil, and the granules are larger and harder on the skin, so it’s not really suited for the face. Also, although other oils are an option, I’ve found that olive oil is superior for a scrub. It will moisturize as dead skin cells are exfoliated, but excess oil will wipe off, so your pores can still breath. An alternative could be the pricier jojoba oil, but I figure that I’m rinsing this scrub off afterward, so I don’t really want to waste something like jojoba!

Coconut oil also works!


Homemade Lip BalmLIP BALM

Gently melt the first two ingredients, then add your choice of essential oil. “Decant” into little tins (like these little steel ones) or into lip balm stick containers (like these- a pack of 12 for under $1/ea.).


PS I’ve posted this link on the wonderful “Raising Homemakers” site. Find even more cool stuff there!

Bacon-Wrapped Scallops: Paleo Appetizer

Wrap scallops in lightly-browned bacon, top w/tomato, basil, & broilThe combination of flavors here is perfect. Even without a party excuse, having these around will give reason to celebrate! I like using large scallops- they’re especially delicious. And this recipe is perfect for those Paleo folk looking for tasty gluten-free appetizers! Makes about 15 pieces, serves 5-8 people.

INGREDIENTS

  • 1 lb. frozen (or fresh) scallops, thawed (approx.. 15 or so)
  • 8 oz. bacon (approx.)
  • 1/2 pint cherry tomatoes
  • Parsely, basil, or spinach

PREPARATION

1. Bite-sized, medium large scallops will use about one slice of thin-sliced bacon per piece. Grill the needed amount of bacon until just golden but still quite soft.

2. Set bacon aside, drain off excess fat, and turn pan back on high. Sear the scallops briefly in the bacon pan. Don’t fill pan too full, or scallops will steam and not brown.

3. Arrange a piece of basil, parsley, or even spinach on top of each scallop, plus half a cherry tomato. Wrap a soft-but-grilled piece of bacon around each scallop, and broil 5-10 minutes until bacon has browned more. (Or bake in 475 degree oven 10 minutes or so.)

Paleo Appetizer: Bacon, Scallops